Written and photographed by Steve Maxwell
There are numerous benefits to raising poultry, and even city dwellers should consider keeping a few chickens. If the looks of the coop are a concern, a small coop with a touch of class and style is the goal of Mother Earth News’ coop design, which makes it even possible to raise a few hens in an elegant neighborhood or small backyard. You can follow this coop how-to and create an A-frame style chicken enclosure that takes up little space and is portable.
Mother Earth News editor Cheryl Long and I consulted poultry experts while designing this special coop design. It keeps backyard poultry safe and secure, makes care super easy, and even looks classy enough for a front lawn. The small coop can be moved easily around the yard, allowing the birds to feed on fresh grass and bugs. The sheltered coop area is 4-by-4-feet with an attached chicken yard that is 4-by-5-feet — ideal for three or four hens. The coop is a great kids’ project. It’s easy for children to help build and then take responsibility for overseeing egg production. The portable coop can even be slipped into the back of a pickup truck — chickens and all!
Coop construction details, main body.
How to Make a Coop
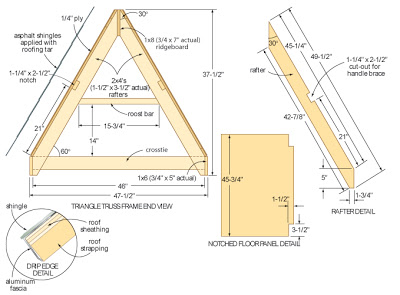
The frame of this small coop consists of a series of truss-like triangles attached to a ridge board to form the peak, and a floor frame delineating the perimeter. The predator-proof grazing area is enclosed by 1-inch galvanized welded-wire mesh, while shingle-covered 1/4-inch exterior plywood protects the indoor roost.
Begin by cutting parts for the five identical and rigid triangular trusses to construct the coop’s frame. You’ll need 10 rafters, five cross ties, and three end spacers: one for each endmost truss frame and one for the frame dividing the interior and exterior sections. I used lightweight and rot-resistant cedar. Before assembling the trusses, prepare the notched cutouts for the two handle braces. Cut a series of kerfs in the notch area and knock out the waste. Next, cut the floor-frame sides, the ridge board and the handle braces.
Then, assemble the rafters, cross ties and end spacers. Join each truss frame with glue and screws at the bottom joints; use a couple of small nails and a temporary, 3/4-inch-thick spacer at the peak. The nails help hold the truss frame together and keep the parts correctly aligned. Later, you’ll take this joint apart to insert the ridge board. Bring the peak together (with a spacer positioned between the rafters), then add the cross tie at the bottom. The triangle shape ensures that all angles are accurate.
Install the Coop’s Wall Sheathing
Add wall sheathing on both end walls and the inside partition. For aesthetics and durability, I used 5/8-inch textured exterior plywood sheathing. We used a hinge-free design to keep the doors simple, inexpensive and bind-free.
The two removable end-doors are secured with swiveling butterfly fasteners, while a sliding middle door keeps the chickens in or out. Pencil in your truss frames on the sheathing to indicate layout lines, then cut the sheathing to shape. Sheath the three walls needing plywood, and install the sliding door. A vent on top of the roost’s exterior door, together with the inner sliding door, provides necessary ventilation for the birds. In cold weather, the vent can be blocked with a piece of cardboard and the sliding door closed each night.
Assemble the coop trusses using temporary spacers and small nails at the peaks.
Assembling the Trusses
While the glue on the truss frames is drying, clamp the two floor-frame sides and the ridge board together and mark the location where the truss frames will be fastened to them. The floor-frame sides are longer than the ridge board, so there must be an equal amount of overhang on each end before you clamp and mark.
Prop up the two end trusses on a level surface and ensure that everything is plumb. If the frame is assembled with any kind of twist present, that defect is permanent. Unite the two outermost trusses with the floor-frame side members, then add the ridge board. Next, put the remaining trusses in place, guided by the layout lines drawn earlier on the side-frame members and the ridge. Use screws and an adhesive to fasten the pieces together.
The extra effort will make the structure more rigid and durable. Finish the main frame by adding the two handle braces, the plywood floor, the roost bar and the nest box. Leave the nest box loose for easy removal when cleaning the interior. Finally, apply a coat of nontoxic, one-time wood finish.
Roof detail plans.
Wire Mesh and Roof
The mesh and roof will tie the structure together. We selected finch welded-wire mesh and secured it to the unsheathed sides of the coop, but left the bottom of the pen open to maximize scratching opportunities.
To protect your lawn, and guard against small nocturnal predators, cover the floor with wire mesh. Fence staples do an ideal job of holding the mesh in place. To sheath the roof, fasten 1/4-inch-thick, exterior-grade plywood directly onto the 3/4-inch-thick strips of solid wood that frame the coop’s edges.
Although thin plywood has the advantage of being lightweight, it is also too thin to take roofing nails. Rotate the coop so one side of the roof is level, and fasten the shingles with blobs of roofing adhesive, using nails wherever rafters are located. (The roofing adhesive in a caulking tube is the easiest to apply neatly.)
Run a line of individual shingles along the entire ridge to protect important wood joints from moisture and to conceal the sharp, raw edges of the wire mesh. Finish up by attaching an axle and wheels, door hardware and replaceable “rot” strips of wood along the bottom.
Connect this trigger cup to a bail of water for a steady supply of clean water.
A Water Source for Poultry
To minimize chores, we included an automatic waterer made by Edstrom Industries. You can connect a garden hose to fill the tank automatically, but it’s probably not necessary when watering just three or four hens. The 1-gallon water supply lasts a long time.
Side view of coop construction with wheel detail.
Handle detail.


3 Comments
[…] more details here… […]
[…] more details here… […]
This certainly answered my challenge, thank you!