This is a companion piece to Liz Fulghum’s article Low-Maintenance Backyard Chickens. Here Liz provides detailed equipment lists and instructions for building a low-maintenance food and water system for your backyard chickens.
This DIY food and water system is ideal for a backyard flock of 3 to 6 chickens and for busy urban homesteaders with little spare time. The food system holds 20 to 30 pounds of feed and supplements, while the water system stores up to 30 gallons, and both are accessible from outside the coop or run. They’re also easy to load, holding two or more weeks’ worth of food and water.
The PVC Feeder
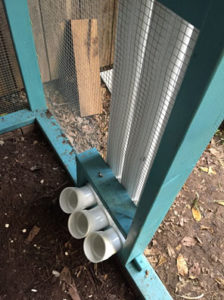
Two of the three PVC tubes hold feed, while the third contains grit and oyster shell. Install the feeders through the protective wire so the openings are accessible to your chickens yet covered by a roof.
Parts and Supplies
- One 10-foot-by-3-inch PVC pipe, cut into roughly 3 equal sections
Cut into 3 equal pieces, this will form the body of the feeders. - Three 3-inch PVC hubcaps
Used as caps for the tops of the feeders. - Three 3-inch 90-degree elbows
Used for the base of the feeders. - Three 3-inch PVC 45-degree street elbows
Used for the feeder opening. - Three 5-inch stainless-steel clamps
Used for clamping the feeders to the chicken coop - PVC cement
- Large grit sandpaper
- Hand saw or PVC cutter
- Drill
- Screws of appropriate length to attach steel clamps to your coop
Optional:
- 3 feet of 2-by-4 wood to create a frame around the hole in the chicken wire where you plan to insert the feeders
Instructions
1 – Cut the 10-foot length of 3-inch PVC into 3 equal pieces using the saw (your local home improvement store may be able to do this for you.) These sections will form the bodies of the 3 feeder tubes and store the food. Be sure to sand down the rough, sawed edges and remove any PVC dust so your chickens don’t eat any.

2 – You want to test the fit of the elbows to your feeder tube before you glue them; this is called a “dry fit.” Take one of the sawed tubes and dry fit a 90-degree elbow to one end. Then dry fit a street elbow onto the open end of the 90-degree elbow. This creates the bottom end of the tube where the chickens will eat. If everything fits snugly, take it apart, apply the PVC cement where the pieces connect, and then press them back in place. Hold each connection for a minute for a firm bond. Repeat this step for each of the feeder tubes.
3 – Before you place the tubes, decide where to install them, and make sure there’s a wide board in place. You’ll use this board to clamp the top part of each tube in place.
4 – Cut a 9-by-9-inch hole in your chicken wire as an opening for the feeder tube mouths. The bottoms of the feeders should sit on the ground, or some sort of solid surface such as the frame of your coop.
Optional: You can measure the final opening and frame it out for extra support using the 2-by-4 if needed.

5 – When you’re ready to clamp the tubes, use a drill bit that’s smaller than the head of your screws but larger than the threads and drill hole at the backside of each hose clamp (the side opposite the tightening point). Screw each of the steel clamps.
6 – Slide the feeders through the clamps and make sure that the tube mouths fit securely through the opening in the screen, then tighten the clamps around their tops. Once the tubes are securely fastened, you can trim any excess off the clamp straps.
7 – Test the PVC hubcap tops for a good fit, but also check that you can remove them easily to refill the tubes with feed and supplements.
The Waterer
Before starting this project, decide where you want to place your rain barrel. It needs to be positioned on the side of the coop where you plan to have the poultry nipples, and ideally, somewhere where you can redirect the rainwater from a gutter into the barrel. The design of this waterer can also be adjusted based on the size of your run by adding or removing additional nipples, or changing their positions.
Parts and Supplies
- Rain barrel
- One 10-foot-by-1/2-inch PVC pipe
- 1-1/2-inch PVC TEE connection
- 2-1/2 inch PVC caps
- Poultry nipples
- 3/4-inch-to-1/2-inch adapter
This will be used to connect the end of the PVC pipe to the rain barrel, so you should double-check your particular rain barrel to ensure it’s a 3/4-inch threaded connection. Purchase a different size if your rain barrel requires it. - PVC cement
- 2 cement blocks
These will be used to raise the rain barrel up to the proper height to allow the birds to drink from the nipples. You can also use a wood platform, stone, or any other material you have handy. - Sandpaper
- Hand saw or PVC cutter
Instructions
1 – Determine the distance between the spot where you plan to place your rain barrel and where you want the waterer to be positioned within your run. This will determine the length of the PVC that connects the rain barrel to the water splitter with the poultry nipples. Cut the PVC to length.
2 – Cut three 4-inch pieces of PVC.
3 – Cut three 2-inch pieces of PVC.
4 – Sand all ends of cut PVC and remove any PVC dust.

Diagram of the basic design of the waterer
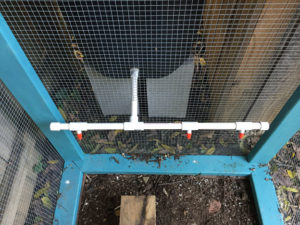
5 – Starting with the TEE, cement a 4-inch section of PVC pipe to each side. Attach another PVC tee to the open end of the 4-inch PVC pipe. Dry fit and then cement a nipple to the stem of those TEE sections. Add as many more horizontal connections as you want for your small flock. Dry fit a 2-inch PVC pipe to either end, cement everything in place, and cement hubcaps onto each horizontal end.
Important: The poultry nipples should all be aligned at a 45-degree angle upward when the whole unit is laid upside down on a flat surface. That will ensure that the chickens can easily access the nipples.
6 – Dry fit and add a PVC section to the stem of your central TEE joint. This section of PVC will connect the whole waterer assembly to your rain barrel.
7 – While you let all the glue dry, move your rain barrel into position. The waterer assembly (pipes and nipples) should be high enough that your chickens have to reach up to peck at the nipples. Use the concrete blocks to adjust the height of the barrel.

Based on the design of your coop, you can adjust the waterer layout. This one is shorter than the diagram, and off-center so it will fit in the space available.
8 – Screw the 3/4-inch-to-1/2-inch male adapter into your rain barrel’s threaded port, located on one side toward the bottom of the barrel.
9 – If necessary, cut a small hole in the chicken wire so the stem of the waterer can fit into your coop. You may need a second pair of hands to attach the waterer assembly to the barrel. From inside the coop, feed the waterer stem through the wire and cement the 3/4-inch end to the 1/2-inch male adapter on the barrel.
10 – Cement takes several hours to cure (dry) — 24 hours is ideal before filling the rain barrel.
11 – Fill the rain barrel with water. The chickens will be attracted to the shiny metal nipples and will peck at them out of curiosity. They’ll quickly learn that they’re a source of water, but remember to provide another water source until they figure it out. If your chickens are slow to peck at the nipples, you can attach small treats to encourage them to peck.
DIY food and water systems will give your birds easy access to sustenance and help you manage your time while enjoying their antics and eggs. Be sure to check them regularly for any problems, but you can do that quickly.
Liz Fulghum is an entrepreneur and technologist who also has a passion for low-maintenance, productive gardening. Her urban backyard homestead is an oasis from busy days and home to raised vegetable beds, fruit trees and shrubs, bees, and a small flock of chickens. You can follow her on Instagram @lizfulghum.


11 Comments
Thank you
can I substitute the floater water dispensor for the nipples?
What do you have in mind for a floater water system?
The quick answer is “Sure!” Do what works for you and your coop. If you need more specific advice, we’ll need a little more information about what you have in mind.
The watering nipples are red to attract the poultry. How can I make the inside of the feeders red to also attract them? I have the same pvc structures, but from what I have noticed, my hens are not eating much out of the feeder (although the gravity-fed watering system works like a champ). How can I safely color the feeder openings to attract them? Thank you so much!!
This is tricky, because chickens are so good at pecking at paint. Your best bet would be to use a hard setting paint such as automobile paint, but I don’t honestly know how well that would stick to PVC.
You might try putting some treats like dried worms or bread in the mouth of the PVC pipe to entice them and get them used to eating from it. Fruit such as strawberries would work too (and it’s red.) Let us know how this works out!!
I am working with Community Hilly Chicken in Bangladesh. I wish to send some sorts of picture rearing hilly chicken in the community in Bangladesh. please suggest me.
We would love to see your pictures. Please email Community Chickens at communitychickens@gmail.com
We are organization in African, Liberia ,we want to cross the American Chicken with the Local Chicken,can you help us with some information?
Please contact our editor at communitychickens@gmail.com for more information.
I’m guessing this would only work in areas where it doesn’t freeze in the winter? We had nipples where we lived before, and they worked great. But I can’t figure out how to keep them from freezing now that we’re in Idaho
If someone doesn’t want to make their own, I provide a turn key solution http://farmerbrad.com/bucketauto