Maat van Uitert shares smart instructions for an easy and strong chicken coop.
Did you get chickens this spring, and now need a coop for them? Want to build it yourself? In this article, we’ll show you how we built an 8-by-8-foot chicken coop for less than $400! This coop is perfect for seven chickens (if they won’t have access to a run or free range) or up to 10 chickens (if they’ll have access to a run or free range). It’s also a stylish addition to any backyard.
We wanted to build a coop that required very little cutting, and that we could build in just a few hours. So we decided to stick with common wood measurements, which resulted in an 8-by-8-foot coop. It only took us about 5 hours to build, and we used simple tools that you probably already own.
Tools and Materials
Tools
- Screwdriver (electric or manual) with interchangeable bits
- Magnetic roofing screw bit
- Phillips head screw bit for the wood screws and oriented strand board (OSB) screws
- Miter saw
- Sawzall, jigsaw, or handsaw
- Stepladder
Materials
- 2x4x8′ wall studs (40)
- 2x6x8′ boards for the floor (for frame & floor joists) (7)
- 2x4x10′ studs for the roof (5)
- 8x4x7/16″ oriented strand board (OSB) (11)
- 10′ corrugated metal roofing material (4)
- 4″ wood screws
- 2″ roofing screws
- 1-5/16″ screws for the OSB
Directions
Building the floor
While a lot of coops use a dirt floor, we built a floor that uses a frame and joists so our coop is more stable. We first pre-measured our boards and mapped out the floor on the ground prior to permanently attaching it together. Using 2-by-6-by-8-foot boards, we could easily lay out the floor without cutting any wood.
After laying out the frame, we then determined where the joists will connect with the frame. We marked those areas with a pen, which allowed us to make sure each measurement was right. It also allowed for faster assembly. This is the foundation of the coop, so it’s important to get it right.
Once we were sure where the frame and joists would connect, we pre-drilled screws into 2-by-6-foot boards. We completed this task for where the frame would connect to itself and where the joists would connect to the frame. This makes assembly fast and accurate.
Prior to attaching the joists, we made sure the floor frame was square. (For full directions on how to check for square, read this article). If the frame isn’t square, the entire coop won’t be secure. So take some extra time on this step!
Once the frame was square, we added the floor joists. In most cases, this part should go quickly, but it’s good to have an extra set of hands to help.
Next, we added the OSB to the floor frame. To complete this part, we laid the OSB on the floor joists and secured them together with wood screws every 4 to 6 inches. When you do this, attach the OSB to the joists – not just the perimeter.
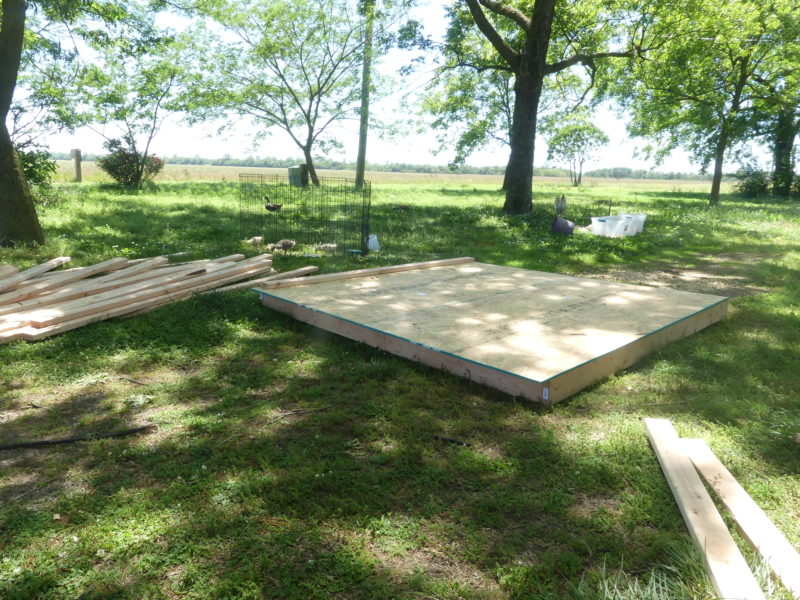
In most cases, there won’t be any overhang. However, if the OSB doesn’t quite fit, just trim it to the proper length with a jigsaw (which is much easier to manipulate for a closer cut than a handsaw). While you can trim your OSB prior to installation, it’ll be easier to adjust the size after screwing the OSB down.
Building the walls
Next, we built the walls. We first framed the walls before attaching them to the floor. This gave us a more solid structure. To create the frame, we measured a 2-by-4 and placed a mark every 16 inches on center. When the wall frame was complete, we had studs every 16 inches (for a total of 7 studs on each wall).
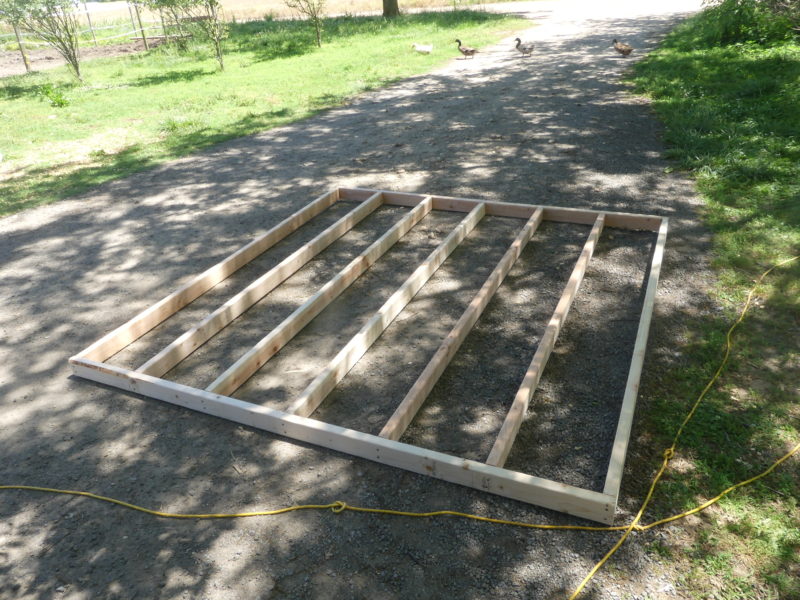
We created the wall frame by attaching the studs together like in the photo (above), making sure the center of the vertical 2-by-4 studs met the line we drew in the previous step. This ensured the studs were evenly spaced.
To make construction easier, we pre-drilled the screws into the bottom 2-by-4 to make it easier to attach the vertical studs. We repeated the process with the top 2-by-4.
To construct the opposite wall, we repeated the steps above.
Next, we attached the wall frames to the floor by placing the bottom side flush with the floor and using screws every 4 to 6 inches. After attaching the wall frame, you might notice the wall flexes and moves a bit. That’s okay. It’ll be more secure when you add siding and the roof to the frame.
Framing the back wall of the coop
To create the back wall (which will be opposite to the coop door), we needed to cut four studs so they fit between the two wall frames. To complete this step, we used a tape measure to determine the space between the two walls we just secured to the floor.
Attach the side wall frames to the floor before building the frames for the front and back of the coop. The space between the two side walls is smaller than 8 feet because the bottom wall frame takes up a few inches of space.
We measured four of the 2-by-4 studs to fit this length and cut them using the miter saw. Once our studs were trimmed, we weren’t able to fit the vertical studs 16 inches on center. So, to add six studs to frame the back wall, we placed them 17-1/2 inches on center apart.
Once the back wall was framed, we attached it to the OSB floor.

Framing the front of the coop
To frame the front wall, we first marked out a 36-inch space on the bottom stud. (36 inches is a standard width, which makes it easier to purchase a prefabricated door for the coop.) To do this, we first determined the exact center on the bottom stud. We then measured 18 inches in either direction from that mark, and attached the studs, leaving 36 inches between them, for a total of four studs on the entire front wall. These studs also act as support frames for the wall.
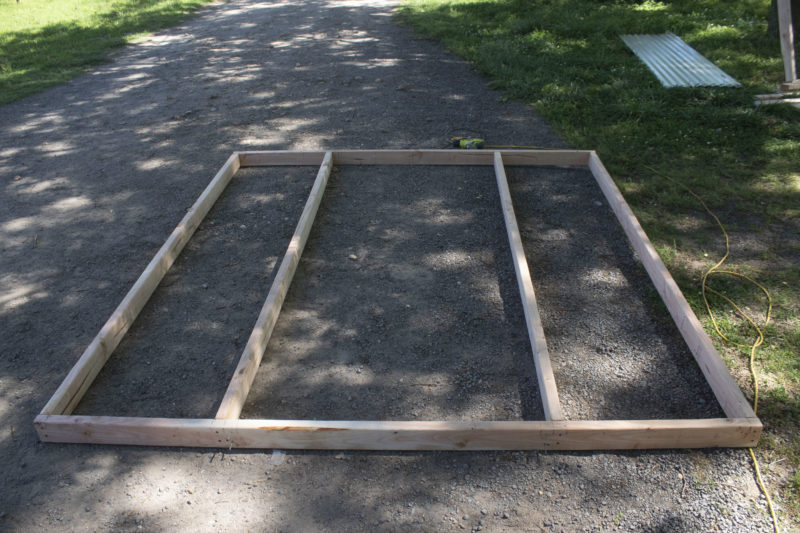
Once the front wall is framed, it was time to create the door frame. We didn’t want the door to be the entire height of the wall, so we needed to frame a smaller space. We measured two 2-by-4 studs to 75-1/2 inches. We then attached them next to wall studs by placing 4-inch wood screws every 4 inches until the door frame was secured to the wall studs.
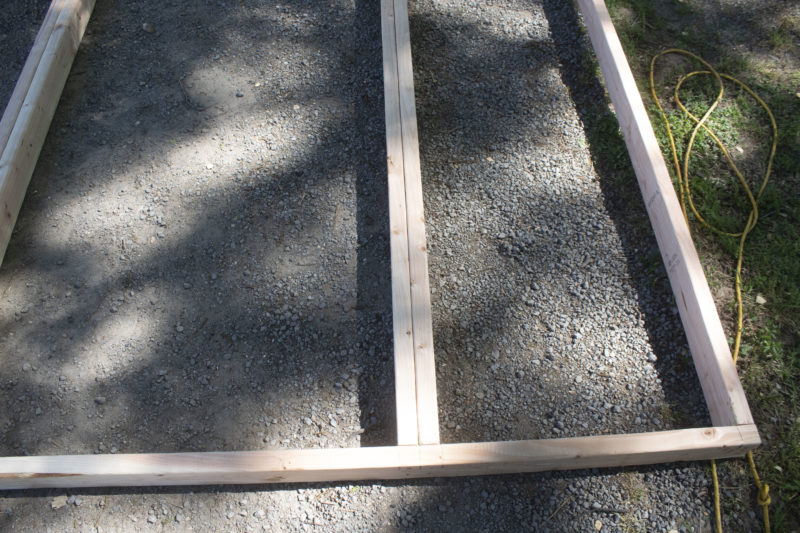
Next, we created header studs (the top of the entryway). To complete this part of the build, we cut a 2-by-4 to create 36-inch header studs. We needed two of these studs. Then, we constructed the top of the door frame by first securing the 36-inch studs together, and then securing them to the wall studs, as seen in the image below.

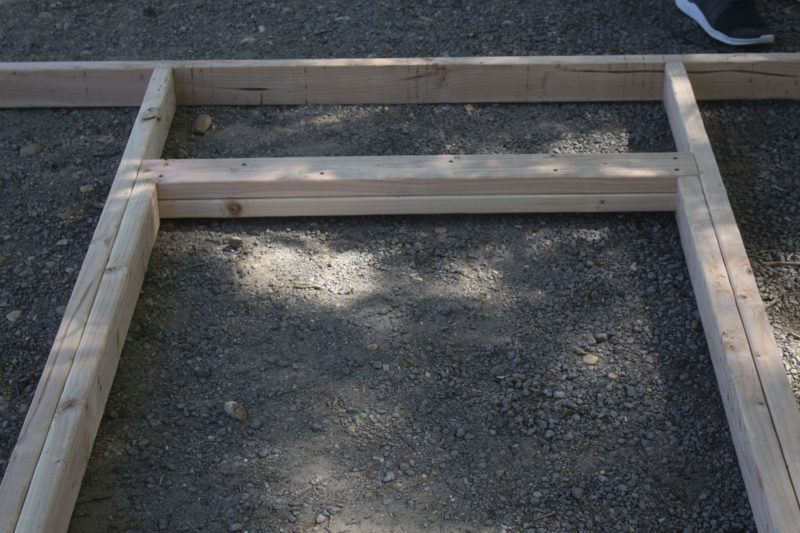
At that point, the door frame was ready for us to add a door. While this might seem like an extra step (since you can purchase pre-hung doors with a frame), we thought this would be easier in the long run.

The entry way was now complete! You can add whatever kind of door you want. For the sake of simplicity, we kept our door frame a standard height and width. This allowed us to purchase a door at our local hardware store.
Building the roof
Next, it was time to complete the roof! It’s one of the most important parts of any coop, since providing a warm, dry home is critical for your flock’s health. For the roof, we wanted the back side to be 12 inches higher than the front side. This was to allow any rainwater on the roof to drain easily, and to increase airflow. We live in the south, where it’s hot in the summers. Since heat rises, we wanted to build a coop that allowed the hot air to leave the coop. A riser allows for better ventilation.
First, we needed to create a riser that gave us the extra 12 inches, while also providing enough space for air flow. To create the riser, we cut a 2-by-4 into five 9-inch blocks, and attached the blocks to 2-by-4s (see image below) with 4-inch wood screws. We used two screws for each 9-inch block.

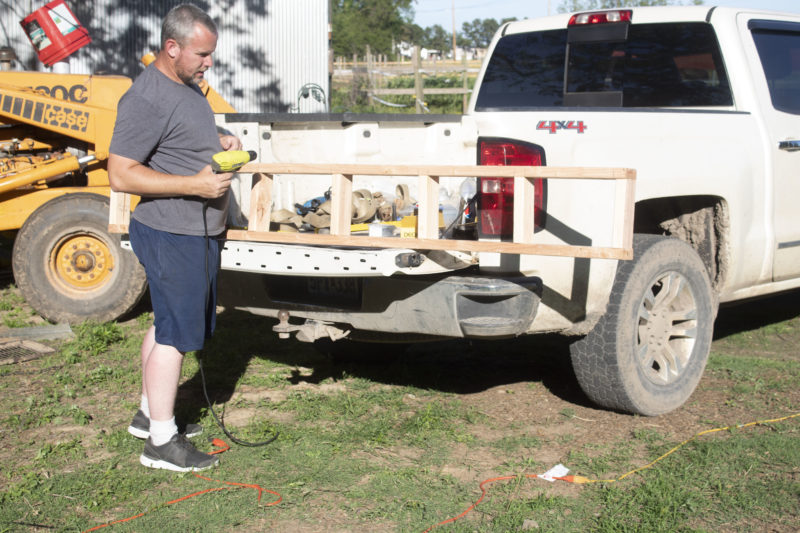
Next, we needed to attach the riser to the backside of the coop so it would be taller than the front side. Using 4-inch wood screws, we secured the riser by placing screws every 4 to 6 inches. Before putting chickens in the coop, we’ll add 1/2-inch hardware cloth to the riser and side walls so our flock can’t escape.

We then needed to create supports for the corrugated roofing material. To complete this step, we attached five 2-by-4-by-10 boards to the riser and to the front of the coop. We left a 12-inch overhang on the front of the coop so rainwater would be redirected away from the door (which will keep the interior of the coop dry).

To complete the roof, we used corrugated metal roofing. It’s cheaper than OSB and shingles, and it’s faster to install. To attach the metal to the supports, we used roofing screws. They ensure that the roof stays waterproof, unlike regular screws. They’ll also provide more strength during windy days and foul weather, and it’s less likely we’ll lose part of our roof to wind gusts. To make this part easier, we used a magnetic bit, which prevented the screws from falling as we installed the metal roof.

We laid the roofing material horizontally. You can also lay it vertically. It doesn’t really matter, although you might have to purchase more to cover the entire space. Additionally, when handling the roofing material, wear gloves and safety goggles. The edges are sharp, and you can easily slice your hand. If the day is windy, a second person will make this process easier and safer.
Finishing the exterior of the walls
Finishing the walls was simple. Because the OSB was 4-foot-by-8-foot, we didn’t have to trim any of it, except around the doorframe. We used 1-5/8-inch screws to secure the OSB to the wall frames, making sure to attach the OSB on the studs, both on the perimeter of the wood and in the center. A second person makes this step easier because they can help you hold up the 8-foot-by-4-foot OSB, and help you determine where the studs are located. When we built our coop, it was windy. Having two sets of hands helped keep the boards in place before they were fully attached to the frame.
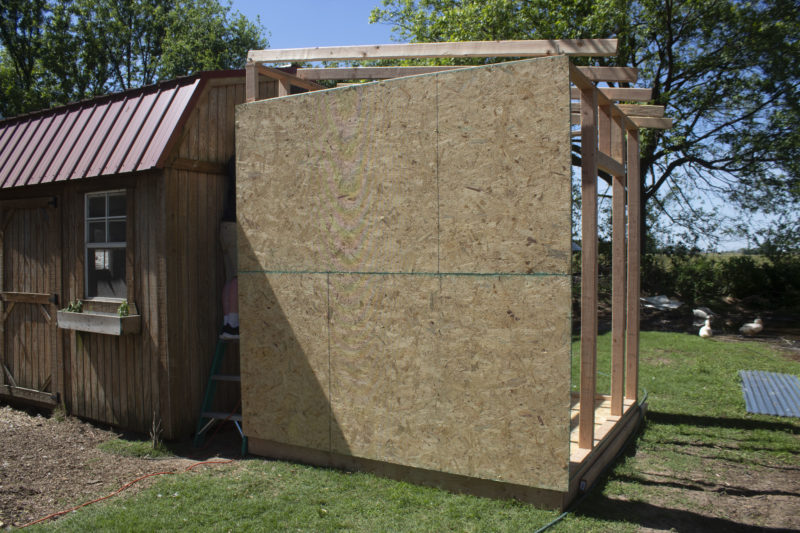
Finishing the entryway
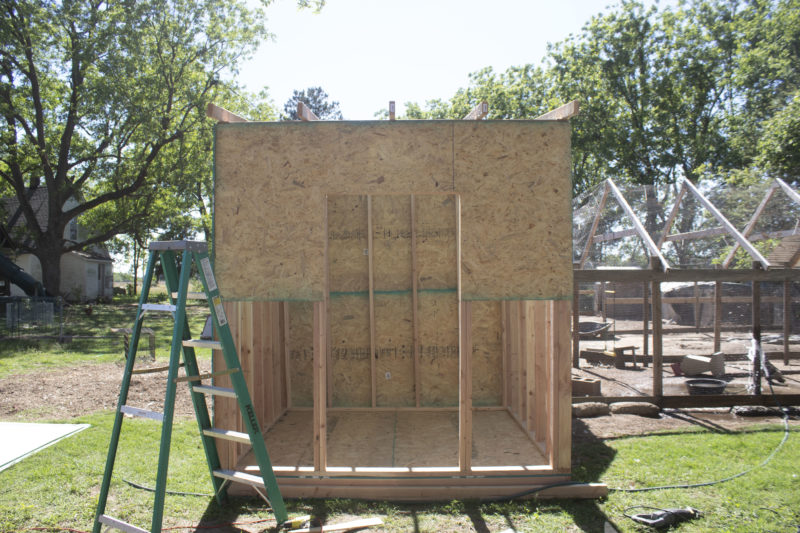
Once the other three walls were completed, we turned our attention to the front of the coop. This part can be tricky because of the door frame. For the front, we placed two 4-by-8 OSB boards on the entire wall (as we did for the other sides). We placed the top OSB first. Once it was attached, we then cut out the door area to preserve the entryway. We tried to stay as close to the door frame as possible, without actually cutting the door frame.
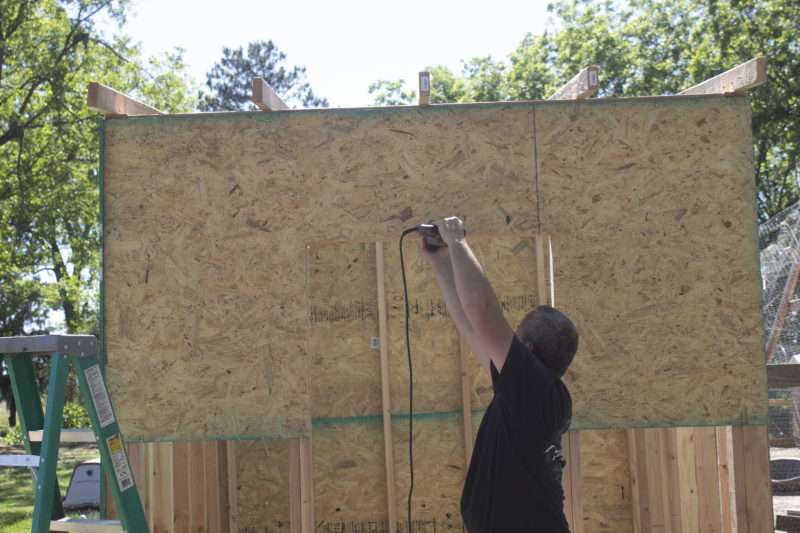
To achieve this, we used a sawzall to cut the door. You can also use a jigsaw or a handsaw. We then repeated these steps for the second (bottom) piece of OSB. You might wonder why we didn’t place both OSB boards and then complete the cuts. In all likelihood, that would make cutting the doorway much harder because it’s harder to fit a saw between two boards.
Finishing the coop
Your coop is now complete! Feel free to finish the exterior whatever way works for your yard. We plan to finish ours with white siding. For now, we applied a base coat of primer, and when funds allow, we’ll add the siding.

If you want even more air circulation, you can add windows. It’s simplest to create an opening that permits you to use a standard-width window. That way, you can purchase a single hung window at your local hardware store, and it’ll be a lot less expensive. You can learn how to install a coop window here.
Feel free to complete the interior as you desire. For example, if you want to add nesting boxes, here’s my owner’s guide to choosing the best nesting box for your flock. You can (and should) also add roosting bars!
I hope these plans for an 8-foot-by-8-foot coop help you out. It’s a pretty simple build, and didn’t take us long to complete at all. The best part is we spent less than $400 for a nice coop that’ll last us for years!
Maat van Uitert is the founder of the backyard chicken and duck blog, Pampered Chicken Mama, which reaches approximately 20 million backyard poultry enthusiasts every month. She’s also the founder of the Living The Good Life With Backyard Chickens store, which carries nesting herbs, feed, and treats for chickens and ducks. You can catch up with Maat on Facebook and Instagram .


13 Comments
It is usually less expensive to build a coop than to buy one. But there’s a catch: building a home for your flock necessitates a certain amount of knowledge, tools, and time. It makes more sense to buy if you don’t have these, and there are a lot of good chicken coops for sale.
I just (Jan 27, 2022) priced out the material list at Lowes in San Jose California. The total for the exact list was $851.68. This was using the least expensive version of everything.
Gary
I may adapt this idea as I also live in a hot climate, but I will cover the “box” in hardware cloth before attaching the riser to make the coop predator-proof. Cuts down on plywood for the roof and work making nice rafters. Also maybe I feel the roof should slope down towards the back, got to think about that… Don’t want to walk through drips to get to the door, but don’t want water building up between buildings. ty Proof again that coops can be simple!
I have used the clear plastic patio roofing panels for the roof in my coops. The chickens love the extra light! On hot, sunny days in the summer, I tack cardboard onto the underneath side of the rafters on the west providing shade in about 1/2 of the coop. I live in southern Utah at a rather high altitude and my winters can drop to -30 F. Letting the sun in like that makes the coops toasty even when it’s below zero outside. For summer, in addition to the cardboard shade, I’ve put 2 windows on each side except where the door is. That side just gets 1 window. In 4 years, I haven’t lost a single chicken to either heat or cold, and the extra natural light keeps them laying well into the fall when the neighbors hens have quit, and they start back up earlier in the spring. The hens that are less than 2 years old keep laying pretty well through the winter with no electric lights.
Thank you for sharing this amazing post. keep up the great work
Awesome! I have a lot of chickens on our farm. Thanks for the idea on how we can spend less on the chicken coop.
Love your chicken community postings. I am a first time chicken person and had to learn a lot on my own. If I would have seen your site, would have helped to stop mistakes. Lost my first chicken to a raccoon a couple of weeks ago. My mistake and a learning lesson.
I did it few months ago and I had a hard time on making the door frame. I can’t figured out the right procedure to do it. I wish I read your article before doing mine.
Wonderfully written article. We also use OSB for a ton of various building applications and have never ran into any issues nor have we ever had a complaint from a customer. I think this construction of a chicken coop is fantastic! Thanks for writing this. Cheers, Rob.
I want to add this to pinterest, but I don’t see a pinterest save.
I’m not sure when Maat last built a chicken coop, but in BC, and I suspect in most of Canada, you can’t buy the 2×4 and 2×6 for under $400, 7/16” OSB is $52 a sheet. And OSB as a construction material? I wouldn’t use it in my house and sure as hell wouldn’t use it in a chicken coop – you’re just building a home for 2 million roost mites.
Steve,
Can you suggest some alternatives that you would prefer?
Hi Steve –
I originally wrote this article 2 summers ago way before the prices of lumber went up. I’m sorry for the confusion! We’ve never had a problem with mites and OSB. This coop did an excellent job keeping our silkies, frizzles, and broad breasted turkeys warm and cozy last February 2021 when it reached -15F here in Southern Missouri (which is exceptionally cold for us). So it’s worked out well for us. Of course, when the price of plywood drops, that’s a good alternative to OSB if other readers want to substitute. Planks (such as 2×6 or 2x8s) are other alternatives, although you will need to add siding (metal or vinyl would work) to reduce the drafts. Thank you for reading!