Ingredients
- 1 recipe Basic Gingerbread Dough, chilled
- 1 recipe Classic Thick Royal Icing
- Black or brown food coloring gel
- 4 white Lifesavers candies
- Red food coloring gel
- 1 red candy dot or round candy-coated chocolate, such as M&M’s
- 4 graham crackers
- 5 silver sprinkles
- 6 Tbsp white fondant, homemade (page 7) or store-bought
- Orange food coloring gel
- Yellow food coloring gel
- 2 or 3 small white jelly beans
Special Equipment
- Ateco #2 and #7 round tips;
- #47 basket-weave tip, and #102 petal tip
- One 10-by-14-in [25-by-35.5-cm] cardboard cake board
- Black edible marker
Directions
Day One
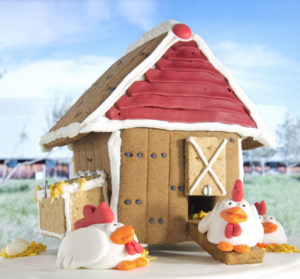
- On a floured work surface, roll out the dough to a thickness of ¼ in [6 mm]. Cut the number of house pieces you need using templates A, D, F, and K as specified (left). Cut out the door in the Chicken Coop Front, a little off-center to the right per the photo. Gently press a tine of a fork into the Sides and Roof pieces to mimic wood slats. Add “nail holes” by pressing a toothpick into the dough randomly in the tops and bottoms of the “boards.” Bake all the pieces following the recipe on page 5 and let cool completely on a wire rack. Store the pieces on a cookie sheet at room temperature, wrapped in plastic wrap.
Day Two
- Assemble the chicken coop: Spoon 1 cup [120 g] of the thick royal icing into a pastry bag and attach the Ateco #7 round tip. Pipe lines of icing on the side edges of the Front, Back, and Side gingerbread pieces and attach them to form a peaked square. Secure with pins (see photo, page 11). Pipe icing around the perimeter of the Chicken Coop Base and gently place the chicken coop on top. Add extra icing around the seams as needed.
- Pipe icing along the upper edges of the front, back, and sides of the chicken coop, and place the Roof pieces care¬fully on top so that they meet at the peak. Secure with pins.
- In a small bowl, mix together 2 Tbsp of thick royal icing with a few drops of black or brown food coloring. Transfer to a small zip-top plastic bag and cut a tiny hole in the corner. Squeeze icing into the “nail holes” on the sides and roof of the chicken coop to create nail heads.
- Let the assembled house dry for at least 4 hours, or up to overnight. When dry, remove the pins. Refrigerate the leftover thick white icing.

Day Three
- In a small bowl, mix together ¼ cup [30 g] of thick royal icing and 1 tsp water to make Thinnest Royal Icing (page 7). Place the cake board on a large piece of aluminum foil, with the edges turned up to catch any drips. Pour the thinned icing over the cake board, covering it completely. Use a bit of thick icing to stick one Lifesavers candy under each corner of the bottom of the chicken coop. Add a generous dab of icing to the bottom of each Lifesaver and position the chicken coop on the cake board.
- In a small bowl, mix 3 Tbsp of thick royal icing with a few drops of red food coloring, adding more as needed to get the desired color. Spoon the icing into a pastry bag, and attach the Ateco #102 petal tip. Pipe the red icing across the triangular area below the roof on the Chicken Coop Front to make the red “wood” siding.
- Attach the Ateco #47 basketweave tip to the pastry bag with the thick white icing and pipe a line of icing along the ridgeline and gutter edges of the roof. Add the red candy to the peak of the roof in the Chicken Coop Front. Attach the #7 round tip to the pastry bag and fill all the remaining roof and wall seams.
- Cut 1 graham cracker with a serrated knife to make a 1- by-1½-in [2.5-by-4 cm] rectangle and pipe an X on it with the #2 round tip. Place the graham cracker piece over the door opening of the coop in a vertical position (to mimic a half-open door), and secure it with icing. At the bottom of the door, attach a silver sprinkle with a dot of icing to create a “hardware latch.”
- For the ramp, lean the gingerbread piece against the doorway, using a ser¬rated knife to trim it, if needed. Secure it with a dab of icing.
- Make the egg-catching nesting box: Cut each of 2 graham crackers into two 2½-by- 1-in [6-by-2.5-cm] rectangles and the remaining cracker into two 1-in [2.5-cm] squares. Hold a rectan¬gular cracker horizontally and attach a square to each short edge with icing to form a squared-off U shape. Pin them together. Pipe icing on the edge of each side of the U and attach it to the left side of the coop, aligning the nesting box with the bottom. Pin to hold. Pipe icing along the top edges of the box and cover the box with the remaining rectangular piece of graham cracker. Add 3 silver sprinkles horizontally along the wall edge for “hinges,” and one vertically in front to simulate the latch.

- To make the adorable chickens: Spoon out 3 heaping Tbsp of fondant, one at a time, onto a piece of parchment and, wearing rubber gloves, press each 1 Tbsp into an oval shape for the chicken bodies. Use six smaller balls to form wings, pressing them into flat ovals and making a few vertical cuts on one long edge to simulate feathers (see photo). Position a dab of thick icing on one of the fondant bodies and press a wing on so that the “feathers” are on the bottom, closest to the tail end. Repeat with the second wing, and do the same for each chicken. Add tiny white balls of fondant for eyes and press flat. Using the edible black marker, make a dot in each tiny ball for an iris.
- Spoon out 1 Tbsp of the fondant, add a few drops of orange food coloring, and knead until uniform in color. Repeat, this time using the red food coloring. Take two-thirds of the red fondant and make three long ovals for the chickens’ combs. Make two cuts straight down with scissors to make three points in each comb. Attach a comb to the head of each chicken with a dab of icing.
- For the beaks, take a third of the orange fondant and make three fat triangles. Attach the base of each one right under the eyes of a chicken with a dab of icing. With scissors, cut a horizontal slit in each so the beaks are open. For the feet, form the remaining orange fondant into six teardrop shapes and attach two to the bottom of each chicken with a little icing, wide end of the “foot” facing out. Use a toothpick to draw a couple toes on each foot. For the three wattles, make three small, thin worms with the remaining red fondant and fold each one in half. Press the loose ends flat, and use a dab of icing to attach the fold to the chicken, below its beak.
- In a small bowl, mix 3 Tbsp of thick royal icing with a few drops of yellow food coloring, adding more as needed until straw-colored. Transfer to a pastry bag fitted with the Ateco #2 round tip. Pipe short lengths of icing in a pile near the nesting box to simulate straw, and pipe more at the top edge of the box to look like it’s spilling out. Place a few jelly beans in the straw pile for the eggs.
- Let the entire decorated chicken coop dry completely, at least 4 hours. Remove any remaining pins.

Thank you to Capper’s Farmer for sharing this excerpt by Jennifer Carden.
More from The Little Gingerbread House:
Excerpted from The Little Gingerbread House with permission from Chroniclebooks


