Learn how to build functional and fun gates for your chicken yard…and more with Frank Hyman. Photos by author.
Part of the reason we keep chickens is because poultry have personality. Our chickens’ pens and coops should have a little personality too. And as far as the pens go, the best place for incorporating personality is the gate.
But gates are one of the trickiest carpentry projects to build even without adding any personality. I’ve probably built and hung three or four-dozen gates for fences, sheds, coops and pens. These projects gave me the opportunity to discover all the wrong ways to create gates. The good news is that when you eliminate the wrong way you have to replace it with a great way. I hope you’ll allow me to share some great tips on building gates for your hen pen.
All Squared Away
We’ve all had the misfortune of walking through gates that sagged: their bottom corners drag on the ground; their latches don’t line up; they look sadly cock-eyed as you approach them. What they probably all have in common is a lack of diagonal support. No doubt the gates were squared-up when first built, meaning not that they were a square per se, but that all four corners made sharp 90 degree angles. But gravity, the gate’s weight–and the occasional child swinging on them—cause gates to sag or “rack” as carpenters would say.
With Diagonals
A rectangular gate or even a wall will rack if there isn’t a strong enough piece(s) of diagonal wood to keep them from sagging into the shape of a rhomboid. In geometry class I thought of rhomboids as rectangles that were going somewhere. Like a rectangle, a rhomboid’s opposite sides are the same length, but its corners are not squared-up—it’s tilted to one side, like a speeding school bus in a comic strip.
Some carpenters use a triangle of plywood attached to each corner to keep it from sagging. Perhaps you’ve seen this method used on screen doors. These triangular pieces of plywood are called gussets. The long side of the triangle provides the diagonal bracing that keeps the screen door square. If you use this technique on a gate, be sure to use pressure-treated plywood that won’t rot in the rain.

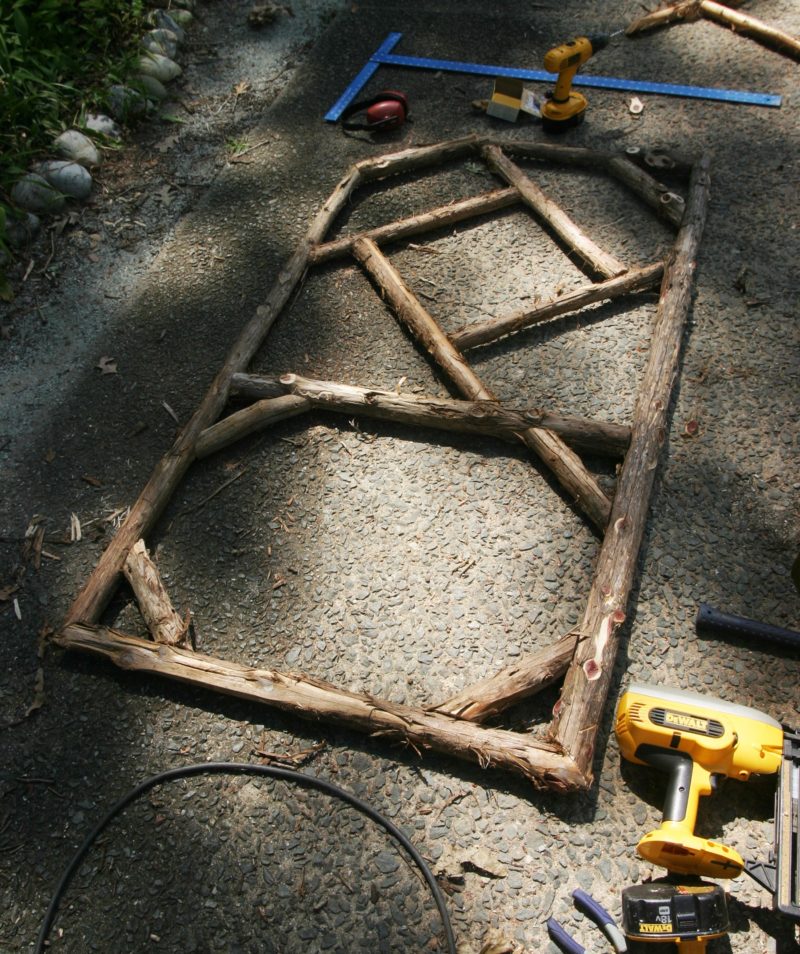
All four corners of this cedar gate are stiffened up with diagonal pieces of wood. Build the gate on a flat surface so it’s all in one plane.
In the photo of the gate built of cedar branches you can see that I used a variation of that technique. Each corner has a short wooden brace at each corner that’s at a 45-degree angle. It forms a triangle at each corner to stiffen the gate. Be sure to pre-drill a hole at each end of the brace so that a screw slips through easily and then bites into the frame of the gate.

Rather than four small diagonals at each corner (as in the cedar gate) your gate can have one large diagonal that runs from the lower hinge to the upper stringer.
In the other photo of a gate you can see there is only one diagonal 2×4 running from the bottom right to the upper left corners of the gate. Yet it’s strong enough to replace the four corner diagonals. (The two horizontal 2×4’s are called stringers and the vertical 1×4’s are called pickets.) The important thing here is that the bottom of the diagonal 2×4 is screwed to the end of the stringer that attaches to the bottom hinge. That way the weight of the upper corner of the gate passes through the diagonal piece and into the gatepost. If you reversed the diagonal to run from the lower left to the upper right, you can see that the diagonal piece would not be supporting the weight of the gate and it will likely sag.
A Few More Gate Tips
1) The other reason a gate might sag doesn’t have anything to do with the gate itself. If the gatepost isn’t stable, the gate’s weight can pull it out of plumb. Then the latch won’t line up or the gate may bind against the latch-post Make sure the gatepost is well supported by a properly mixed batch of concrete in a deep-enough hole.
2) Don’t build your gate until the posts are in place. Once they are, build the gate to allow a ¾ inch gap on all sides to keep it from binding.
3) If practical, orient your pen gate so that it opens out. It will be easier to slam it shut if the hens make a run for it.
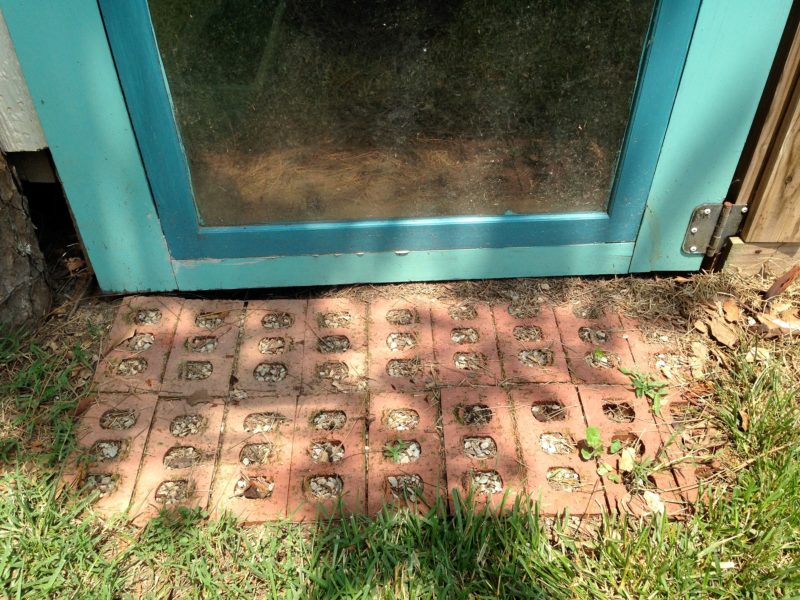
4) To keep critters from digging their way under the gate, install a threshold of bricks or flagstone that reaches about 12” outside the gate. I call this a Not-Welcome Mat. Leave a gap of about ¾” between the Mat and the bottom of the gate so nothing can shimmy under it. If you build the threshold before installing the gate, 1×4’s laid flat on the Not-Welcome Mat will be thick enough to temporarily support the gate as you install the hinges since they are really ¾” thick.

Keep vermin from digging under your nice gate by installing a Not-Welcome Mat of brick or stone.
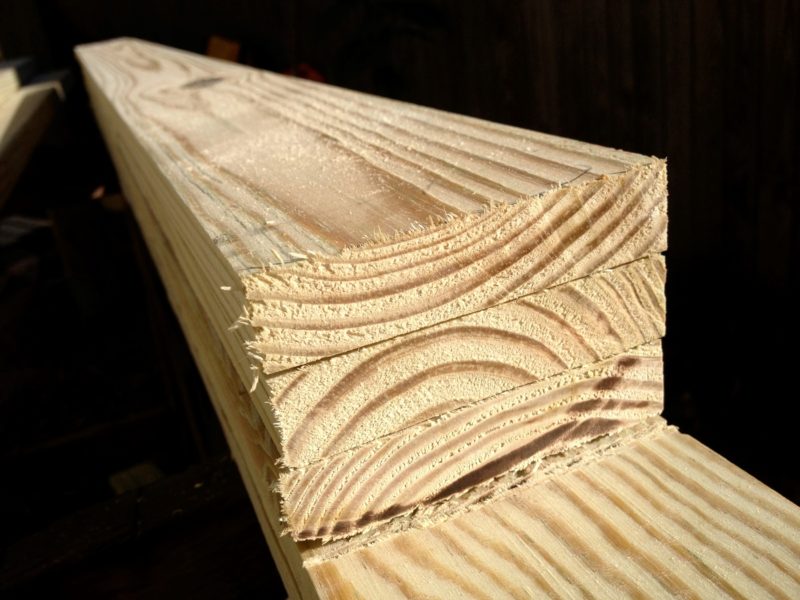
5) If your gate will have pickets all of the same length, you can save a lot of time on measuring and marking with this little trick (which also works for cutting pickets for a fence). Measure and mark just one picket to the proper cutting length. Neatly stack it on top of the other boards and clamp them together onto the sawhorse. Use your circular saw to cut along the mark. At its normal depth, the saw will cut through three 1×4’s and leave a mark at the proper length on the fourth board. See the photo of the cut boards. Look closely and you’ll see that the fourth board has a cut that you can use to guide the saw on cutting three more boards. But double check that all the boards are neatly lined up and clamped down. You can also use a jig saw to stack and cut multiple pickets to the same length.

If you’re cutting multiple pickets, stack them so you can cut several at once to save time.
Don’t Come Unhinged
The hinges on the gate to your hen pen are critical elements. Any moving parts exposed to the weather are likely to fail if they aren’t made from quality materials and installed correctly. Use only rustproof gate hinges created for outdoor use. And take your time installing them—you’ll only want to do this once.

Your gate will need a hinge near the top and one near the bottom. This bottom hinge is also near the bottom point of the diagonal brace the carries the weight of the gate into the gate post.
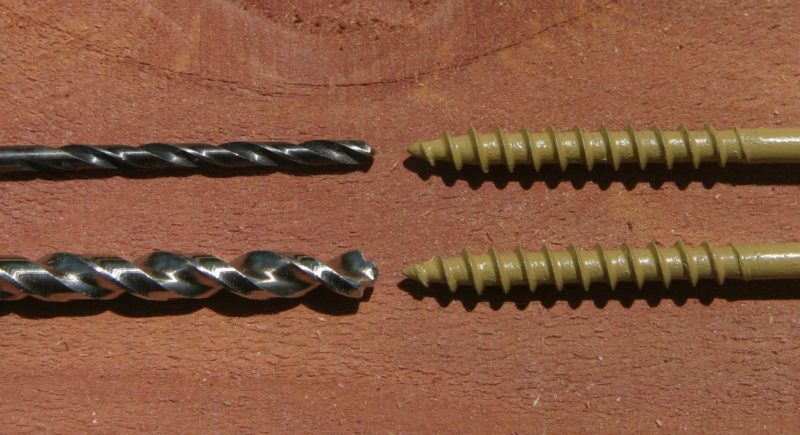
Attach the hinges to the gate first. (You may want to have a helper hold the gate in place first to make sure the screws will line up properly on the gate and post). When you’ve determined their location, mark the holes with a pencil, remove the hinge and drill pilot holes for the screws. Use a bit with a diameter that matches the diameter of the shaft of the screws. That way the threads will bite into the wood, but the hole you drilled will keep the screw from splitting the wood.

Match the diameter of the bit to the diameter of the shaft of the screws for the hinge. That way the threads will bit into wood without splitting.
With the hinges installed, prop the gate into the opening with a ¾” gap on each side. Use some pieces of wood under the gate to hold it level. Either a helper can hold the gate upright or use boards and clamps attached to the posts or a single board to prop it up.
Once the hinges are in place over the gate-post mark the holes with a pencil so you can drill a pilot hole the same diameter as the shaft of the screws, same as you did on the gate. With the screws driven into the gatepost you can remove any supports, clamps, etc. and enjoy watching your gate swing freely. But resist the temptation to ride it like a merry-go-round. Your last step is to attach the latch at a comfortable height. And then pour yourself a cold one. You deserve it. Aside from building stairs and roofs, you’ve just accomplished one of the trickiest tasks in carpentry.
Frank Hyman teaches foraging to chefs, organic farmers and wannabe foragers. He is licensed to sell mushrooms in two states and writes the Feral Feast column on foraging for Paleo magazine. He’s also an award-winning garden designer, carpenter, stone mason and political rabble-rouser. His writing has been published in The New York Times, Organic Gardening, Bicycle Times and a dozen other magazines. His book on trouble free chicken keeping (Hentopia) came out in December 2018. Learn more about him at Frankhyman.com.


