Make sure your chickens have clean and free water with this DIY waterer idea stolen… uh… borrowed from Frank Hyman.
Water, water everywhere, but not a drop in the hen pen that’s fit to drink, because it’s often mucked up with dirt, debris, or chicken poop. Yuck! Theoretically, keeping chickens can be a lot of fun. It can also be a lot of drudgery. Thankfully, providing clean water could be one of the lowest maintenance chores of your chicken adventure.

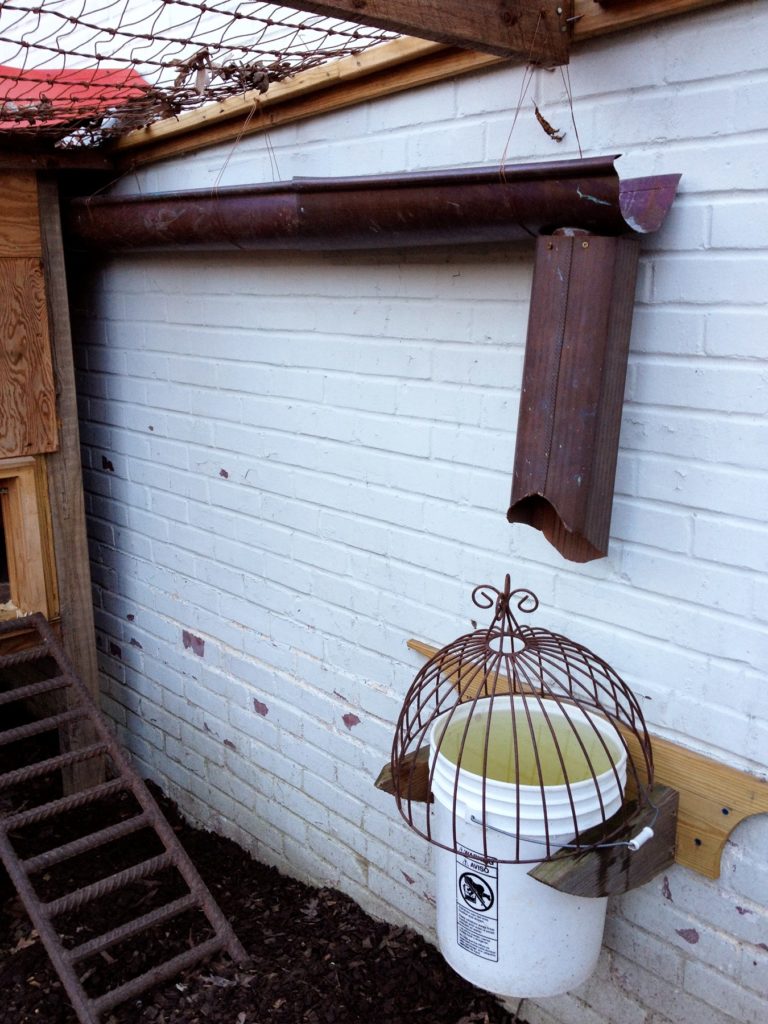
The DIY waterer is the white bucket on the right.
My wife, Chris, was the one who wanted chickens. I just wanted the fewest possible hassles. I searched the internet, plowed through books on coops, and attended local Coop Loops. The result? I found and combined two practices that make our watering system hassle-free. First, at a tour in Raleigh, North Carolina, I saw how one hen keeper had harvested rainwater for his hens. Second, online I found a couple that uses watering nipples (similar to a gerbil’s waterer) screwed into the bottom of buckets. No saucer of water for birds to tip over, get dirty, or poop on.

I used scavenged copper gutters and downspout til fill waterer, salvaged metal flower basket keeps hens from roosting on waterer
I combined the two practices for our hen habitat, and you know what? The chickens have never fouled the water, and we’ve only had to hand-fill the waterer maybe 10 times in 7 years. That’s about as hassle-free as you can get. Here’s how we did it.
Harvest Free Water
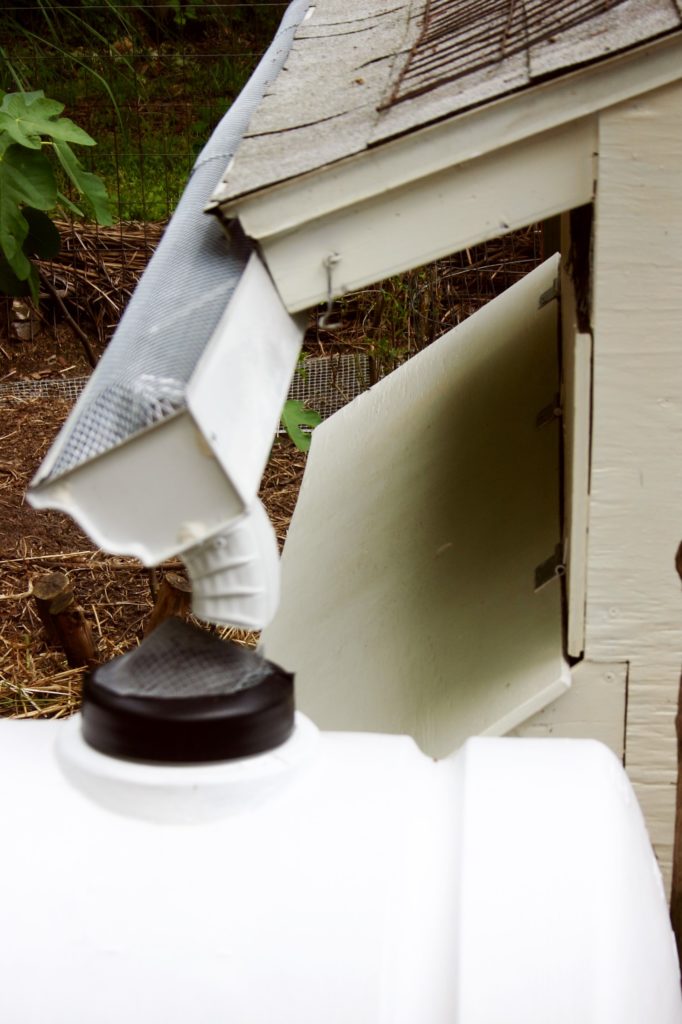
Will Hooker, a popular permaculture teacher and one of my design professors at North Carolina State University, collects thousands of gallons of rain from the roof of his house into large cisterns to water his garden. He essentially created a scale model of that system to harvest the rain that falls onto the roof of his chicken coop. A store-bought rain gutter screwed to the eave of the coop’s roof captures rainwater. The water then goes through a downspout into a 35-gallon plastic cistern with a tap. He and his family use this rainwater to refill their chickens’ waterers.
My wife and I saw this setup long before we got serious about chickens. I knew even then that we would steal — I mean borrow — this idea of harvesting rainwater for our hens. Chickens need to drink from one-half to one pint of water a day, depending on how hot it is. The 5-gallon bucket we use holds enough water — 40 pints — to last our three hens about two weeks in summer, without refilling. (Think worry-free vacation.) In the eastern United States, we can reasonably count on a decent rain every 10 days or so, unless a drought has set in. So thanks to rains that automatically top off the waterer, we’ve only rarely had to refill it by hand.
Different Climates, Different Containers
In drier climates, obviously the birds will be thirstier and the rains will come less frequently, so be ready to top off your container by hand, or set up multiple buckets. If you need more water than what a 5-gallon bucket holds, use a tote or a 35-gallon plastic garbage can. Or use a 275-gallon intermediate beverage container (IBC) if you have hundreds of chickens. These will all be too heavy to suspend, so set them on cinder blocks or bricks at the right height for your chickens to stand under.
Because algae thrives in light, if your water container is clear or doesn’t have a top, algae will grow in the water. You can prevent algae by painting the outside of a translucent container a solid color and/or keeping a cap on it. Cutting a hole in the cap just large enough for the downspout to go through lets water in and keeps light out.
Gutter Talk
To get the water from the roof to your waterer requires two things: a gutter and a downspout. The main trick with gutters is to use a level to make sure the gutter isn’t level; it has to run slightly downhill toward your waterer so the water will flow into the downspout and not sit stagnant in the gutter, which will provide a haven for mosquitoes. The big-box stores sell sections of gutter with self-tapping screws so you can attach them to the lower edge of the coop roof. Even a 4-foot section of rain gutter will catch lots of rain in just a few minutes.

A gutter on Will Hooker’s coop refills the cistern every time it rains.
To get from the gutter to the waterer, I recommend using a 4-foot-long flexible downspout. That way if your gutter and waterer aren’t perfectly aligned, you can adjust the downspout so the water gets where you want it to go. Mark the shape of the end of the gutter onto the lid of the waterer using a pencil. Drill a hole at each corner, and then use a jigsaw to cut a line between each corner hole. That creates the perfect-sized opening to insert the end of the gutter into the waterer.
Water the Hens
I wanted to avoid using any chicken waterers that had saucers, knowing the chickens would just get them dirty and that they would need regular cleaning. While browsing the web, I found http://www.avianaquamiser.com/ by Anna Hess, author of The Weekend Homesteader, and her husband, Mark Hamilton. Mark also wanted to reduce his workload, so he used watering nipples screwed into the bottom of plastic buckets and bottles as a way to water their chickens. This watering system is similar to the waterer for a gerbil. Disturb the tip and water comes out; leave it alone and the water stays contained. The water is clean, there’s no saucer to get dirty, and no need for daily cleaning. I immediately decided to steal — I mean borrow — that idea too.
Nipples and Buckets
You can buy watering nipples from most local ag supply houses. You’ll also need an 11/32 drill bit to make the hole in the bottom of your bucket. That will be just the right diameter for the threads of the nipple to bite into the plastic and create a watertight seal. This bit size is rarely included in sets, so you’ll have to buy it individually (perhaps the poultry nipple industry is in cahoots with the drill bit industry!). Also, spend the extra money for the nipples that have a rubber gasket, just so you’ll be sure they won’t leak. One nipple is enough for about three birds, and three nipples are the most you’ll want to put on a 5-gallon bucket.
And if you’re making your waterer in the winter, let the buckets get to room temperature indoors before drilling. The drilling will work at any temperature, but if the buckets are cold, the plastic won’t be flexible enough for the threads of the nipples to bite, and they’ll just go around in circles.
Unfortunately, chickens won’t instinctively know how to use the nipples to get water. Your best bet is to remove other water sources. Then catch and hold the dominant chicken so its beak is under the bucket. Lightly bump her beak against a nipple until water dribbles out onto her beak. At first she’ll squawk, wondering why you’re tormenting her, but she’ll soon realize where the water is coming from and will start drinking. If you’re lucky, the other chickens will see the dominant hen drinking from the nipples and will figure it out too, but don’t count on it. You’ll get quicker results giving them their own intro to the watering nipple. But that’s still easier than cleaning up dirty saucers of water.
Cold Weather
Speaking of cold weather, sometimes our waterer did freeze up in winter. That meant someone (and by “someone” I mean Chris) had to pour a kettle of hot water into the waterer. But now we use an electric birdbath heater. They’re reliable, have a thermostat, are made to be outdoors in water in winter, and only cost about $25. We crack the lid open enough to drop the heater in the water, and then plug it into an exterior-grade cord that’s plugged into a GFCI outlet on the porch. If you don’t have a GFCI outlet, an electrician can easily install one to protect your house from electrical shorts. For added protection, we put a plastic clamshell over the place where the two cords connect. No sense taking chances with electricity.

Keep your waterer from freezing with an exterior-grade cord, birdbath heater, thermostat, and green clamshell cord connector, which will keep rain from shorting out the heater.
Where to Put the Waterer
You want to mount the bucket at or above shoulder/head height for the chickens so they can reach up under it to drink. For the nipples to work, the bucket must be suspended so the bottom is about as high as a hen’s back. Farmtek sells a dandy metal hoop, called a “collapsible bucket holder” that is strong enough to support a bucket holding 40 pounds of water. Attach it to the outside wall of the coop or a post in the pen. I strongly recommend against keeping a waterer or feeder inside the coop. That can only multiply the problems for a chicken keeper, including such things as mold, humidity, rot, vermin, etc. It’s better to think of the coop as simply a box for the hens to sleep in safely at night.

Farmtek’s collapsible bucket holder is the best way to suspend a 5-gallon bucket waterer.
With the time you save, you can pull up a chair and watch the hen show while sipping your favorite beverage — from a nice clean glass.

Frank Hyman speaks at the Mother Earth News Fairs. He is a carpenter and designer, and the author of “Hentopia: Create Hassle-Free Habitat for Happy Chickens; 21 Innovative Projects.”


6 Comments
My chicken watering nipples came with the drill bit included., from QC Supply store about 5 years ago.
I just replaced that broken bucket with a food grade one that comes with 4 nipples already installed , also from QC Supply. It’s by far the best system for hassle free clean chicken water.
Thanks for the tip about QC Supply, will keep them in mind.
You mentioned algae and we deal with that even in closed containers here in Florida. What about mosquito larvae in open water? Is it as harmful to my chickens as it is to my dogs?
You’ll get algae even in closed containers if the plastic lets light pass through–light is food for algae. Use a container with a solid color–that does not admit light–or use paint to block sunlight.
Mosquitoes are no fun for anyone. In the summer we put a small piece of Mosquito Dunks into the bucket every month or so. You can buy them at garden centers. Donut shaped things that have a microbe that kills mosquito larvae without harming other living things. Totally safe to use and very successful at killing mosquito larvae.
What do you do with the excess water flow when the rain overfills the bucket?
As the photos show, the water bucket is outside, so it doesn’t matter if it’s overflowing, because it’s raining.
I don’t advise putting a waterer or a feeder inside the coop in any event. Just creating opportunities for problems of various sorts–spills, vermin, etc.
The coop works best if thought of simply as a box just big enough for the chickens to sleep in. Fewer problems that way and I think we all want to have fewer problems!