Chickens needs baths too, but they prefer dust. Liz Fulghum shares her tips and tricks to help your birds exfoliate and dislodge insects.
If you’re new to chickens, you may have noticed your flock digging a shallow ditch in a sunny spot and then rolling around, getting all down and dirty. They may puff themselves up into a great downy ball, flop around on their stomachs and sides, and then shake themselves out in a flurry of dust and feathers before getting up and doing it all over again. More than just antics that are amusing to watch, this behavior – known as dust bathing – is actually an important part of chickens’ social wellness and overall health.
Dust bathing helps chickens clean and exfoliate their skin, absorb oils, and shed loose feathers. It also works to dislodge and remove insects and parasites, such as mites and lice. Usually done in groups, dust bathing is very much a social activity that’s calming and enjoyable for your flock.
Given a run or a yard to free-range in, chickens will make their own area to dust bath in. They love taking their dust bath wallows in loose, light dirt. If you garden, chances are their favorite spot will wind up being in one of your flower or vegetable beds.

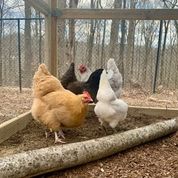
Chickens exploring a new dust bath area. Chickens don’t like change, so it’ll take time for them to adjust and start using the space.
If you want to preserve your plants, or if you just want to give your chickens the full luxury spa experience inside their run, you can build a dedicated spot for dust bathing with your own mix of material. Building your own dust bath is a quick and easy project that doesn’t have to cost very much, but it’ll have big returns in overall chicken happiness.
Just keep in mind: Like with many other things, enticing your chickens to use something that you build instead of something they make for themselves is half the battle. You can, however, stack the deck in your favor by understanding what makes the ideal natural dust bath and recreating that same environment. If your dust bath looks and feels as good as or better than one your flock might make themselves, chances are they’ll pick yours.
So how do you make a dust bath your chickens will love? It’s pretty simple:
Decide on Dust bath size and placement
The first step in building your dust bath is to decide where you’re going to put it and how much space you have to work with.
Chickens love to dust bathe where it’s warm, dry, and safe. Choose a spot that gets good sun throughout the day, is sheltered from strong winds, and offers some cover or protection from predators. The sun will also help warm the soil quickly on cooler days and dry it out if it’s gotten wet from rain or snow.
Plan your dust bath area to be as large as you have room for. Since dust bathing is a social activity, it’s important to leave enough room so that several chickens have space to stretch their wings and roll around without bickering or competing for space.
Choose a Dust bath container
Now that you have a spot in mind, find a container for your dust bath. It doesn’t need to be fancy or expensive; basically, you just need something that’ll contain all that lovely, loamy dirt mix so it doesn’t get kicked all over the place right away. (It will get kicked all over the place eventually, so remember that over time you’ll need to replenish the materials in your dirt bath.) Your container should also be low enough so that your chickens can easily get in and out.
Here are five easy, inexpensive ideas for containers:
- Small kiddie pool or old sandbox
If you have children who have outgrown a small plastic wading pool or sandbox, you can repurpose either of these to make your dust bath. They’re typically a good size, shallow enough to allow for easy access, and, since they’re made of plastic, very durable. - Logs and stumps
Ideal if you want a natural look or if you happen to have had a tree chopped down recently, large logs and stumps can be arranged to create a frame for your dust bath. The wood will break down over time too, and insects will find homes in the decaying wood, giving your chickens more interesting places to forage. - Rocks and stones
If you have some larger rocks or stones, you can use these to create a border around an area you want to cordon off for your dust bath. Look for rounded rocks to make it as safe as possible for your chickens. - Wooden frame
If you have some scrap lumber lying around, you can use it to build a wooden frame for your dust bath. Keep it shallow enough that your flock can easily get in and out. Choose cedar if you want something to last for more than a few seasons. Avoid pressure-treated lumber if you’re trying to raise your flock in a chemical-free environment. - Plastic tub
If you have a small run and are short on space, a low plastic tub like those used in restaurants can be a quick and cost-effective container option that’s also low-profile.
Dust bath material and mix
Dust baths should be made up of light, airy material (like your garden beds). Heavy clay soil will just compact from traffic and rain and won’t entice your chickens at all. The bonus of building a dust bath for your chickens is that you can customize a soil mix and add extras that’ll help keep your chickens even healthier and happier.
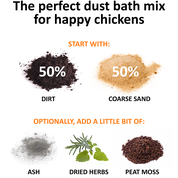
The basic mix for a dust bath starts with 50 percent dirt and 50 percent sand. From there, you can add small amounts of additional materials.

Dirt
Regular old loamy soil from your garden is the foundation of a good dust bath; the lighter, the better. Avoid clay if you can. Clay is heavy, moisture-retentive, and will tend to stay compacted even after you add other materials to help lighten the mix.
Also, avoid using any soil that may have been treated by chemicals, or bagged potting soil that includes added fertilizer.
Sand
Sand helps lighten soil, prevents clumping, and adds a rougher texture to your dust bath that your chickens will love for grooming. Chickens will also consume particles of sand while dust bathing, which has the same benefit to their digestion as grit.
The most important part of selecting sand is to make sure you choose a very coarse grade (fine playground sand is a no-go). Fine particles that are kicked up into the air can easily get inhaled and cause problems with chickens’ delicate respiratory system.
Ash
Ash from fire that hasn’t had any chemicals added to it (no lighter fluid, no fire-starting bricks, no treated wood) can be a powerful additive to your dirt bath mix. Charcoal contains calcium, Vitamin K, and magnesium, all of which benefit your chickens’ health. As they scratch and forage while dust bathing, they’ll ingest trace amounts of these minerals.
Dried Herbs
The essential oils from herbs can act as mild natural insecticides. They can also help keep the dust bath area fresh. If you grow or have access to an abundance of herbs, sprinkle your dust bath with dried rosemary, lemon balm, mint, or lavender.
Peat Moss
Need to lighten your mix even more? Peat moss absorbs an enormous amount of water and can help keep your dust bath mix dry and loose.
A quick note about Diatomaceous Earth…
Food grade diatomaceous earth is made from crushed up, fossilized algae that’s composed primarily of silica. The “food grade” designation means that it’s safe to ingest, but it’s used as a natural insecticide because it’s deadly to any insects with an exoskeleton. The fine particles have microscopic, sharp edges that puncture the insects’ bodies and cause dehydration, which quickly leads to death.
Since it’s so effective and safe to ingest, it’s a natural conclusion that it might be an excellent additive to your dust bath. In fact, it’s often suggested for use in the coop as well as an additive to food to treat worms.
But here’s the rub: Like fine sand, diatomaceous earth is made up of very small particles that tend to turn into a powdery cloud when disturbed and could be inhaled by your chickens while they’re dust bathing. Expert advice is mixed about whether this causes any short- or long-term respiratory issues, so do some additional research to make the right decision for you and your flock.
Putting it all together
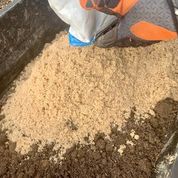
When building your dust bath for the first time, mix everything together well in a wheelbarrow, and then shovel the mixture into your new space.

Combine all the materials together and mix well before filling your new dust bath space.
Over time, you’ll need to amend the area with new material as the old material breaks down and the chickens gradually kick it out.
Since chickens are generally skittish around new things, sprinkle the area with some treats to encourage them to start scratching and exploring the new space.
You might not catch them in the act right away. But, if you start to see shallow wallows in your dust bath area, you’ll know your chickens have started to use their fancy, new dust bath!
Liz Fulghum is an entrepreneur and technologist who also has a passion for low-maintenance, productive gardening. Her urban backyard farmstead is an oasis from busy days and home to raised vegetable beds, fruit trees and shrubs, bees, and a small flock of chickens. You can follow her on Instagram @LizFulghum.


