Inexpensive, easy-to-build chicken coops
Once you get caught up in the idea of having chickens, it’s easy to find yourself spending more on them and the coop then you ever thought you would. For many people chickens are a hobby as well as pets with benefits: I’m thinking of my wife and me. We spent so much of my time and her money on our pagoda-roofed coop that we won’t break even on eggs in our lifetimes. But for folks who don’t have that kind of budget, building a highly functional and attractive coop can still be very affordable by using free pallets.
A few years back, at a feed & seed store, I met a young 1st grade teacher named Katie Ford checking out the tubs full of chicks. She told me she wanted to build a coop so she could keep birds, but couldn’t afford one on a teacher’s salary. When I told her I would help her build a coop made mostly from free, salvaged pallets, her eyes lit up.
Katie wanted to keep two types of chickens in the coop for breeding and selling chicks–Lavender Orpingtons and Copper Marans–so she would need to keep them separate. I joked that the coop would be like a duplex and christened it “Katie’s Kooplex.”
Pallet-able Poultry Palace
Free pallets can be found at any feed & seed store, garden center, HVAC supply or big box stores. I’m a carpenter and designer and have used pallets for other projects. I hadn’t yet built a coop from pallets. But it was on my wish list to do one, so we were both lucky to meet each other. I’ve since helped another chicken-keeper build a sturdy, good-looking backyard coop almost completely from pallets.

Someone else with a pallet project in mind. My advice: do not attempt this at home.
The lumber for a coop doesn’t need to be expensive or rot resistant if there’s a roof to shed rain and a foundation of rot-resistant blocks to raise the coop off the ground. Pallets aren’t rot resistant, but they are a never-ending source of free lumber for coops. You’ve seen them at any big box store that uses forklifts to move products from shelf to sales floor. The modern pallet was invented in conjunction with the forklift in the 1920s to reduce the labor costs of shipping products. Most pallets are made of pine planks that are stiff enough to hold a ton of weight, but soft enough for a coop-builder to drive a screw easily.
And as proof that we live in the United States of Anxiety, concerns about chemicals in pallets are a tiny bit overblown. Pallets treated with chemicals are expensive, marked with brightly colored paint and almost always get sent back to the source for re-use (because they’re expensive). Most pallets are unpainted and have been heat-treated to kill bugs (look for “HT” stamped on the pallet if you’re concerned). These pallets are cheap and normally get sent to the landfill unless chicken keepers salvage them for coops (or bonfires!!).
The next day Katie and her stepfather Johnny Ford made a few trips back to the feed & seed store with her truck and brought back two dozen pallets. That was enough free lumber to build the floor and wall framing and siding for a coop big enough for 24 chickens. I picked up some lumber and cinder blocks to make up for any salvaged materials they didn’t have and we got started the following afternoon.
Like me, Johnny mis-spent his youth doing carpentry so we worked together well. Which means we could correctly interpret each other’s grunts as meaning, “hand me that stick of wood” or “hold this while I drive this screw.” We also both got a kick out of the fact that Johnny makes his living as a butcher, since emotionally secure carpenters often refer to themselves as “wood butchers.”
Get Floored
The first step is getting the coop up off the ground. Any raw wood touching the soil will rot away. Get wood at least a foot above ground, so splashing rain can’t keep it damp enough to rot; you only want to build your coop once.
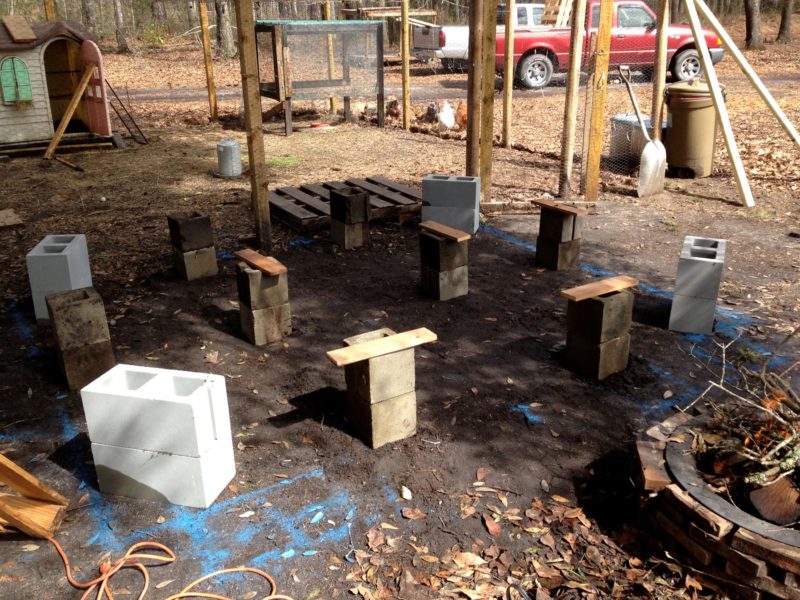
Whole pallets laid on flat ground determine the foot print of the pallet coop. Blue paint marks their corners so cinder block piers can be placed correctly. Wooden shims create a level surface on which to lay the pallets. In the background, Katie had re-purposed kids’ discarded playhouses as temporary coops.
The cheapest sturdy foundation for a coop would be a pair of cinder blocks stacked to support the corners of each pallet. These stacks are called “piers” in construction-speak. Cinder blocks are eight inches high, so a pair raises the pallets 16-inches above the ground. This height also essentially creates a moat under the coop that makes it harder for vermin to get in at night and gives the chickens a place to get out of the rain during the day.
Given the small size and weight of a backyard coop, it’s not necessary to dig footings below the frost line for each pier. The movement of the soil during freeze-thaw cycles and drought-monsoon cycles won’t damage the coop. The worst that could happen is that a coop door may become sticky. But that’s easier to adjust with a saw, rather than digging and pouring foundations.
On flat(ish) ground, I laid out a footprint for the coop by marking the corners of the floor pallets where they lay. Six pallets gave us a floor of 12-foot-by-7-foot or 84 square feet. Chickens require 2 to 3 square feet apiece in a coop, so this would be more than enough room for the two-dozen chickens Katie envisioned. Using my paint stick I marked the position of the corners of the pallets on the ground. Instead of paint, you could also use lime, flour etc. Remove the pallets and set your cinder block pairs on your corner-marks so they will support the pallets (Note that two-hole cinder blocks have a wider center section on one side that forms a bit of a handle: it makes them easier to pick up with one hand). Set the cinder blocks so that the outer edge of the pallets will slightly overhang them. That way rain can’t rest on the top of the blocks and soak into the bottom of the pallets.
Use a 4-foot plumb-stick to check for level. You may need to dig down a bit or add a wooden shim to get their tops at roughly the same level. Then gently place the pallets on the cinder blocks to make your floor framing. There’s no need to fasten the pallets to the cinder blocks. Short of a hurricane, its weight will keep it in place.
Screw It Up
All these pallets need to be fastened together. Nails are cheaper than screws, but not everyone has the upper body strength or sure eye to drive enough nails to hold a coop together without smashing a thumb or wishing the coop would build itself. Also banging away with a hammer knocks the pallets out of joint.

Pallets laid out as floor framing (the blue color is from Frank’s paint stick). One pallet has been temporarily left out to better show the structure. When all the pallets are screwed together, the pallets will be covered by plywood. A coop with a floor of any length, but only one pallet wide (such as the two pallets on the left), would be narrow enough to support a roof made of pallets.
I recommend fastening pallets with three-inch long exterior screws and a corded drill. Whether using nails or screws, you need more than half of the fasteners’ length to go into the second piece of wood to have a secure connection. Screws will go through pallet wood pine without needing a pre-drilled hole to get them started. Make life even easier with a magnetic drive guide. This simple gadget fits into the drill and has a slot for a matching bit (which should come in the box of screws). It’s magnetic so it holds the screw better. But most important, it has a sleeve that slides down over a long screw to hold it at the proper angle to drive it straight. This is a very valuable tool for novice carpenters.
Put a trio of 3-inch screws through each edge of floor pallet A and into its neighboring pallet B: one near each end and one in the middle. Then drive three more screws from pallet B into pallet A. Repeat with pallet B and C, C and D, etc. Double check to make sure every edge is secured before moving on. Now lay ¼-inch thick plywood across the floor pallets for a smooth surface that will be easy to clean out. A few dozen 1.5-inch screws will hold the plywood in place. Cut off any excess plywood that hangs out past the pallets.
Call of the Wall
Each pallet has two long sides defined by solid 2×4’s and two short sides that are more open. Turn the pallet so the long, solid sides form the top and bottom of the walls. That way you can drive 3” screws through the 2×4’s and into the floor pallets. When you build the roof, rafters or roof pallets can be screwed to the 2×4 on the top of the pallet wall. The 1x planks of the pallets run vertically and function as studs for support and for attaching exterior siding.
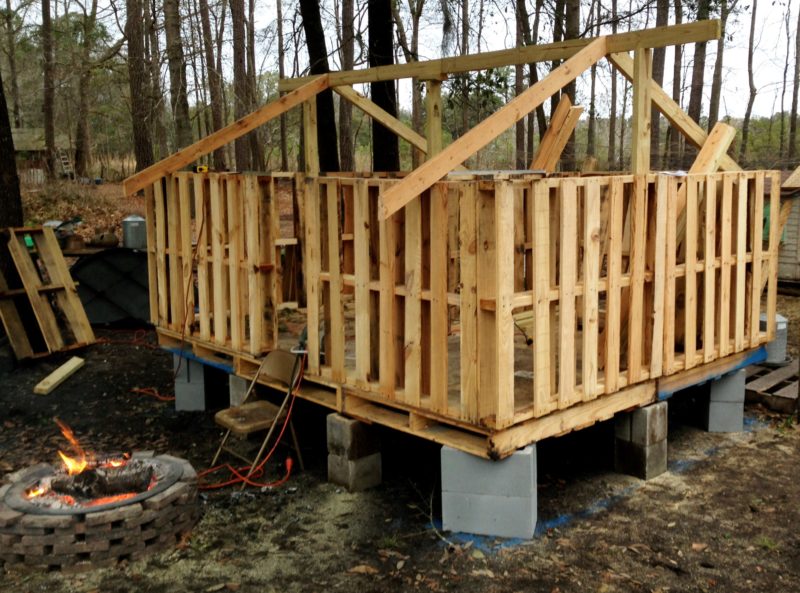
At this stage, Frank, Johnny and Katie had been working a total of three hours to install the piers, floor, walls and part of the roof framing. Pallet coops can be built quickly.
Drive three 3-inch screws through each the bottom edges of each wall pallet and down into a floor pallet for a secure connection. Use a trio of 3’ screws to connect the ends of the 2×4’s on the first wall pallet to tie into the second wall pallet’s 2×4’s and vice versa. Where the pallets meet each other at the corners, you’ll have to drive the 3-inch screws in some creative diagonal angles, but that will work fine. Err on the side of using too many screws rather than not enough. The siding and roof framing will help tie the wall pallets together too once they’re installed.
At one or more points on the wall you’ll have to cut a pallet down in size to make it fit. Temporarily leave that one smaller wall pallet out, so that you can step inside the coop to frame the roof before installing the siding.
With the wall framing up, any kind of saw can be used to cut out openings in the 1x wall planks for chicken doors, clean-out doors and exterior nest boxes.
Rapid Roofing
We framed a 6/12 pitch gabled roof using new 2×4 rafters and 3-inch screws for Katie’s Kooplex. This framing was covered with salvaged metal roofing panels of different colors donated by a roofer whose child was in Katie’s class.
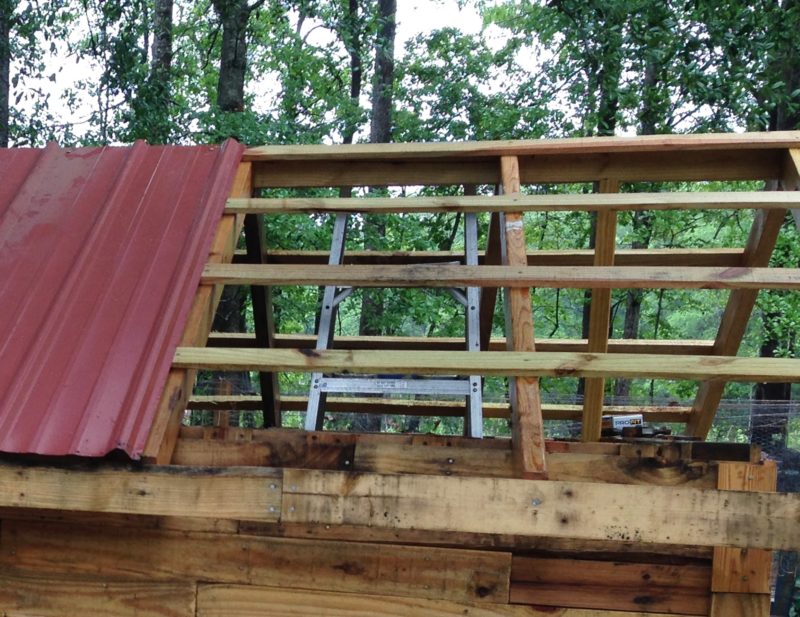
Strips of 1×4 planks support the donated metal roofing
Cutting and installing roof rafters like that can be a challenge even for experienced carpenters. The good news is, if you’re building a smaller coop, you can avoid that hassle and expense by using pallets for the roof framing too.
A pallet roof only works if you design the coop floor to be any length, but only as wide as one pallet. That’s a narrow enough width that pallets can be used as roof framing. A pallet coop that’s one pallet wide and two pallets long is big enough for 10 hens. That’s plenty of hens for most backyard chicken keepers. Make it one pallet wide and three pallets long and it will hold 15 hens. You can then build the roof out of pallets supported by at least three 2×4 ridgepoles and a 2×4 ridge beam laid flat. With a helper, a drill and some 3” screws the framing for the roof will be securely tied to the flat ridge beam and the wall framing.
With roof pallets in place it’s easy to screw down metal roofing. But if you want to use shingles or less expensive rolled roofing (the same material as shingles, but in a roll like paper towels), first cover the pallets with ¼-inch plywood (or planks cut from pallets) so you’ll have something to nail the shingles to.
Exciting Siding
The siding on your pallet coop could also be made of plywood, but this article is about saving money. Plus I think you get a better looking coop by using pallet planks for what’s called “board and batten” siding. It will look like an old time barn.
Most books and articles promote taking apart a pallet in a way that requires a lot of elbow grease: yank the planks apart with a pry bar; then back each and every nail out with a hammer. That’s hard work. Depending on your strength it might take a good hour to break down just one pallet. It’s a pretty good Crossfit workout, but there’s a better, easier, faster option.
If you own or can borrow or rent a reciprocating saw (also called a Sawzall or as some carpenters refer to them: “the wrong tool for every job”) you could dismember one pallet in ten minutes instead of sixty. In 30 minutes you would have enough free 1×4 and 1×6 planks for the siding on your coop. Plus, you can use the 2×4’s from the pallets for roosts to support your hens as well as cobbling together ridge poles and ridge beams to support a pallet roof.
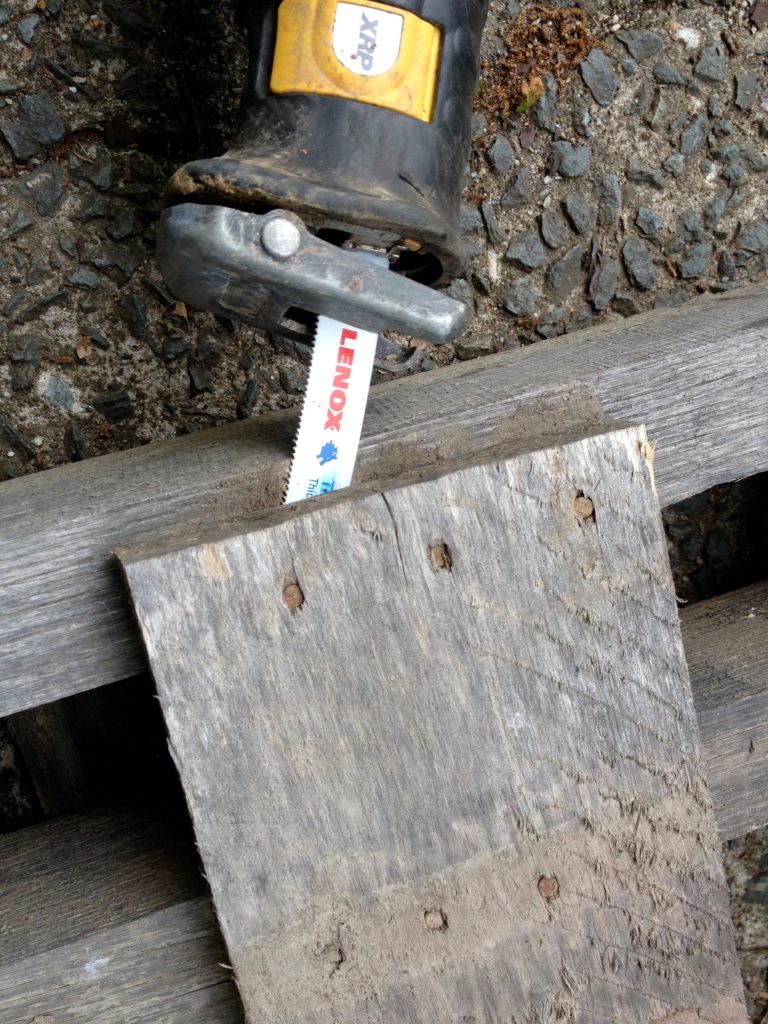
A sawzall cuts through the nails of pallets four times as fast as you can pull them apart and back out the nails. Slip the blade between pieces of wood as shown here.
As you can see in the photos, a saw with a metal cutting blade—they have tinier teeth than a woodcutting blade—can slip between the planks and cut the nails right through. Here are a few handling tips:
1) Power tools are loud, so wear earplugs or earmuffs to protect your hearing. You might want cotton or leather gloves to keep from getting splinters or snagging on a cut nail.
2) To keep the saw from rattling the teeth out of your head, be sure to push the foot of the tool—the flat collar around the blade—against the wood to absorb the vibrations.
3) To cut through the nails faster, gently rock the saw up and down a bit while keeping its foot snug against the wood.
4) Sometimes the blade will be cutting into the wood a bit, but that’s not a problem.
5) Before each cut, check the teeth of the blade. If they’re worn down, switch out the blade for a new one. Cutting up three pallets for siding may use up a blade or two.
6) When finished, stack the lumber where it won’t get wet. Put bricks under the stack to keep it off the ground and a tarp over the lumber to keep rain off until it’s time to build the coop.
Use 2-inch exterior screws—a pair at the top, a pair at the bottom and one in the middle–to secure the planks vertically to the 2×4’s of the wall pallets. They will cover the gaps in the wall. This process will go pretty fast and give you a good looking coop. Katie chose to run her plank siding horizontally to match her house. That’s a fair choice but it will take more pallets cut apart for the planks.
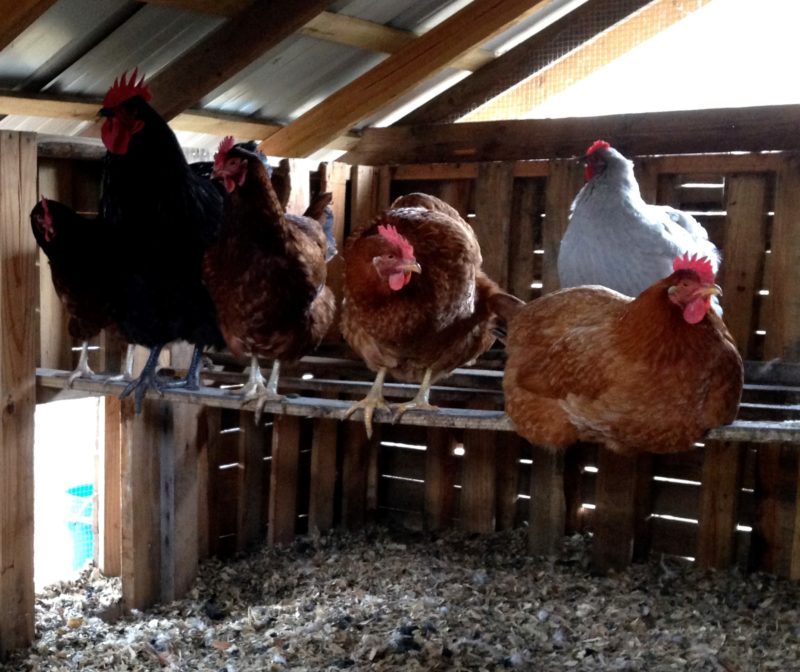
Interior of the pallet coop, showing (L-R): pop door, hens on roost, pallet walls covered by pallet siding, coop gable covered by hardware cloth for security and ventilation.
With the piers, floor, walls, roof and siding in place you can add doors, fencing on the gable openings and an exterior nest box to make a sturdy, safe, handsome, very inexpensive DIY coop for your backyard flock.
Now with all the money you saved on lumber, take your sweetie out shopping for chicks.
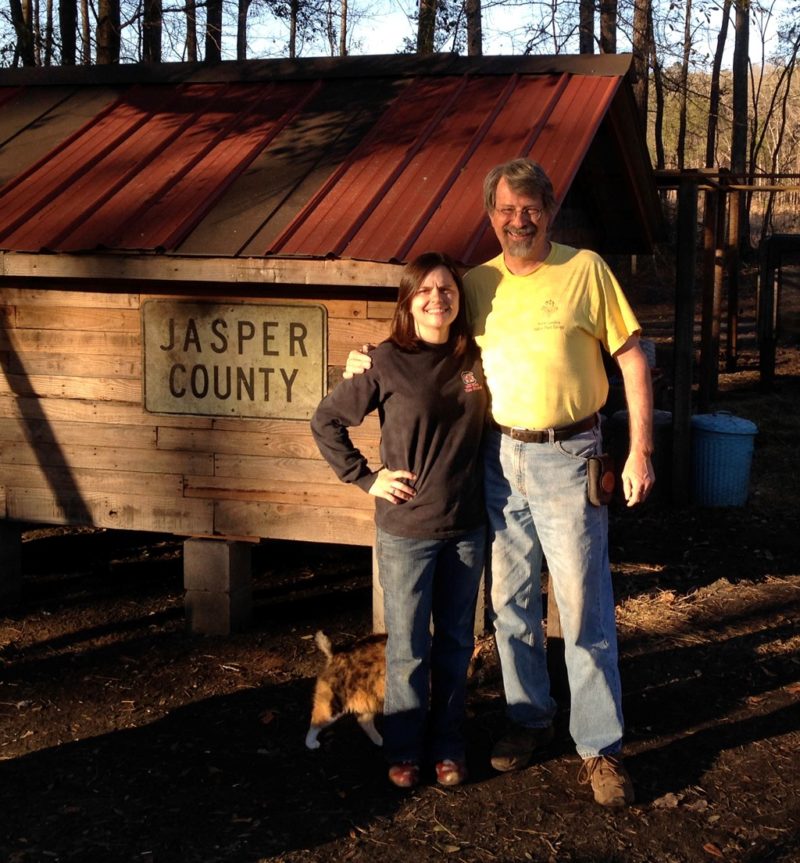
Katie and Frank in front of Jasper County, SC’s first pallet coop.
Frank Hyman is a carpenter and designer with 40 years construction experience on homes, farms and gardens on two continents. He is also the author of Hentopia: Create Hassle-Free Habitat for Happy Chickens; 21 Innovative Projects, which covers pallet coops and other truly DIY infrastructure.


31 Comments
My husband and I decided we would try the chicken thing about 2 years ago, with a little help from his sister. That’s a story within itself. I started doing some research, and came upon this program : ( https://chickenworld4.blogspot.com/p/build-your-own-chicken-coop-2022.html )
I looked through all the plans and found couple that I liked, so I purchased it. The beauty of these plans is, with a little know how and imagination, you can easily build your own, professional looking, coop. You can also use the basic design and tweak it to fit your needs and/or tastes. I built my first coop in 1 weekend.
Love the detail and tips! I got a pallet buster for my birthday then found out I am not strong enough to pull the pallets apart. I am going to try your sawsall method this time! 64 year old Mother of 30 hens with 30 in he incubator. lol.
Fantastic work! Well done. Just make sure you replace the planks the chooks perch planks as materials become available.Perching on inappropriate perches can strain tendons in feet and legs. We look for long straightish branches about 7-4 cm in diameter (as they taper off) .As we are in Australia, we find eucalyptus branches readily available and good for purpose; many species have limbs that extend out long and rangy to reach the sunlight on outer canopy. Although if i had a choice I’d go cedar or cypress for mite deterrent etc. Functional, customisable ( cladding, insulation etc- can be used in warm or adapted for cold climates, cheap, quick and very attainable. (can focus dollars on fox proofing instead. I applaud the under house space for dust bath and weather shelter.
Would a coop like this work in Wisconsin? I know the coop needs ventilation but the pallet coop looked like it had gaps. I do like the idea of using pallets to create a coop.
Thank you for your post.
A good read
Stephanie
Thank you for your great design, easy to follow instructions and pictures. We are new to chickens and plan to sweep out the coop floor to go into our compost pile for gardening. What do you recommend that we use for bedding on the floor? Is it possible to just use a thick layer of dirt on the floor since it will be going into the compost pile? Thanks for your help.
Hi Frank!
Great pallet coop! Thanks for an awesome write up! I’m struggling to see how the roof would look in my mind’s eye with a single pallet instead of a pitched roof?
Thanks.
Simon.
Thank you for the good info. I learned a lot from your article and will try to build a one pallet wide coop for my pair I’d mini chickens.
A critter just ate my 3 chickens. I need to build a better coop, but I’ve never built anything and I’m on a budget. This just might be something I can do!
I personally build a great chicken coop following this easy and step by step guide I found HERE: ( easy-chicken-coop.useful-tips.info ) The thrill of opening the nestbox and finding your first egg can’t be beaten – and even now, finding eggs in the nesting boxes each day is still a joy.
My wife and I decided we would try the chicken thing about 2 years ago, with a little help from her sister. That’s a story within itself. I started doing some research, and came upon this program bit.ly/3goOopf
I looked through all the plans and found couple that I liked, so I purchased it. The beauty of these plans is, with a little know how and imagination, you can easily build your own, professional looking, coop. You can also use the basic design and tweak it to fit your needs and/or tastes. I built my first coop in 1 weekend.
Love the design. But what about nesting boxes how do you get to the eggs
Nest box is mounted on the outside, so you don’t have to put on muck boots to gather eggs. Build it from parts of pallets or plywood. My book Hentopia has plans for the Best Nest Box cut from plywood–the folks at any big box building supply place will cut the pieces for you for little or no cost.
There are many advantages to owning your own chickens. Farm fresh eggs are healthier, tastier, and readily available from your own back yard. Meat birds are fast growing, take little space to raise and are fairly inexpensive for the resulting outcome in food production. Raising your own chickens means you get to decide what goes into the making of the final product.
Although you could have an exterior egg box what about during the winter?
We do have an exterior nest box. So we don’t have to put on muck boots or enter the pen or coop just to gather eggs. Not a problem in winter. Gather the eggs each morning or each afternoon and they won’t be frozen–their temp is over 100 degrees when they’re laid! 🙂
How do you get in to clean it?
You don’t have to go inside to clean it. A coop big enough to enter costs lots more money and time to build and the chickens don’t need it that big. Just stand by the clean out door with a rake or push broom and sweep bedding out and onto a tarp or wheelbarrow, etc. for dumping in the compost. I built my coop high enough that the doors open over the compost bins–just sweep bedding straight into the bins for a big time save. Good luck with your appropriately-sized coop project! 🙂
Hello! Love the design! Can you explain the one pallet wide roof in detail a little more? That’s what we are going for! Super excited. Thank you!
Good question, and to answer it would require writing another entire article. The best info available right away for you on building a coop out of pallets (especially one sized so that you can use pallets for the roof!) would be found in the chapter on building a pallet coop in my book on DIY backyard chicken keeping, Hentopia. That chapter covers all materials, tools, measurements, etc. you need to build a very sturdy and almost free chicken coop. The advice in the book will save you many times its cost in materials, reduced aggravation, better long term maintenance, etc. especially if you’re not already a carpenter. The book is aimed at making coop and habitat building easy for non-carpenters. There’s not another book like it. Good luck! 🙂
Awesome article! Thanks so much for the inspiration! I’m in the process of designing my coop and want to use the Deep Litter method, and I’ve read that it works best on the ground with a dirt floor so all the beneficial microbes can get in there. Do you have any advice for modifying this for such a method? Ideally the bottom 12 inches of the coop should be water resistant in order to hold all the layers of matter. I imagine cinder blocks could work, but would the pallet structure on top still be sound without the wood floor built across them? Any advice you can give is greatly appreciated!
The pallet coop would not be as sturdy without the floor.
My recommendation would be to forgo the litter box floor idea. Without adding moisture the litter is not going to do much composting, to be honest (I wish some organization would to an experiment to demonstrate that this is not really an improvement on litter management over just sweeping the floor out directly into a compost bin…). I would build a pallet floor off the ground 1) so it doesn’t rot, 2) so the birds have one more place to get out of the rain or sun, 3) so vermin can’t get into the coop. Good luck and let me know how your project turns out!
Thank you for the reply. I’ll build the coop with a floor as you advise. Your article is very helpful and I’ll be referencing it numerous times as I build this coop. I’ve got my pallets; just need to wait for the snow to clear! Thank you again!
Thank you for all the helpful info on building a coop out of pallets. I plan to build one this spring and will start collecting pallets, recycled windows etc now for the project.
Suggestion: put floor tile or vinyl flooring on the floor for easy cleanup. Moat floor installers have leftovers they will give for free. Also linseed oil on the roosts to keep them bug free.
Good suggestion. I also use scraps of pond liner. And are you saying linseed oil on the roosts keeps the roosts bug-free or the chickens?
I would consider placing 2×4 lumber along the top of the pallet walls for strength, and better support for the rafters. Since there appears to be nothing tying the walls together, as much strength as possible might be a good consideration. This particular coop looks as if it is for warmer climates, and some suggestions for those that live in colder winter areas to provide better protection for the chickens would be greatly appreciated. Thanks in advance!
Each pallet already has a 2×4 running across the top for the rafters to rest on (and a 2×4 across the middle and a 2×4 along the bottom of each wall). There are some pallets that don’t have 2×4’s running through them, but that would be using something very different than what I recommend in the article. I’ve been doing carpentry on homes and garden structures for over 30 years, so the plywood sheets and the pallets are plenty sturdy enough with 3″ screws tying everything together. The walls won’t rack or bulge if built to my specifications.
As for chickens in colder environments, each bird comes with a Mother-Nature-issued down coat and a countercurrent blood system to keep from losing body heat. So even in the north, I don’t recommend using a heater inside the coop. Better to just throw them extra scratch for the calories. How do you think families in Maine and Canada in the 18th century were keeping chickens alive through the winter? Before electricity, insulation and plastic sheeting? Plenty of breeds are bred to survive a norther winters in a basic coop. They’ve been doing it for centuries.
Can this type of coop be made an extra pallet high? Like for a human to walk into to make cleanup easier?
Unless you’re an experienced carpenter, I don’t recommend building a coop that high from pallets. Also, a smaller, lower coop can be easily cleaned from outside with a push broom. Unless you’re re-purposing an existing building for a coop, I strongly recommend against building a coop that’s big enough for people. The best coop is just big enough to be the box that chickens sleep in at night. Everything else–nest box, feeder, waterer, etc.–should be mounted on or positioned outside the coop IF you want to have the fewest problems and the easiest maintenance. Good luck with your project!
very nice idea. Turned out well. I think I’m gonna try it.
Thanks! Let us know how your project turns out. I’ve been getting lots of photos of pallet coops emailed to me. I look forward to seeing yours! 🙂