by Meredith Chilson
Photos by author
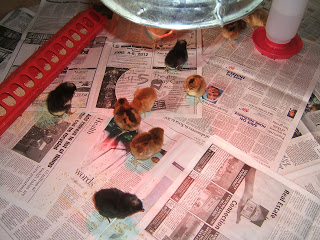
It was May 8 when our fluffy little chicks arrived at the post office. We settled them into their new home in our attached garage, within a corral of cardboard, under a heat lamp, and spent the better part of several days with our lawn chairs pulled up to the side of the cardboard.
What fun to watch the antics of baby chicks as they learn their way around a world outside an eggshell—as they bump bodies and stretch their wings and assume their place within the pecking order of a small gang of pullets.
How they have grown over the past six weeks! Feathers have come in – first on wings and tails, until now all the fluff left is a tiny bit on some of their heads. They’ve learned to jump up onto the top of their waterer to peer over the side of the corral, and the other morning, I came out with their breakfast to find one of them roosting on the side of the corral and another running around the garage in a panic. Time to move the chicks.
I’ve been preparing the chicks for this day: The heat lamp has been turned off day and night for nearly two weeks. The outside temperatures are warmer now, and the chicks have enough feathers to help keep them warm even if night temperatures dip into the 40s. Their “baby” feeding trough and quart-jar waterers have been changed to a hanging feeder and a 1-gallon waterer. The next step is to prepare their new home.
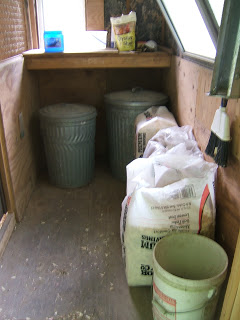
Our 96-square-foot chicken coop has two rooms: The first is about 4 by 8 feet, and it’s used for storage. It can also be quickly made into a hospital wing if we have a chicken that needs to be separated from the others for some reason (maybe the others are picking on it and it needs a quiet spot to heal). It’s also become a nursery when we have had a hen sitting on eggs—although it’s been a while since that’s happened. And, it becomes the “Teenager’s Apartment” when I have newly feathered chicks ready to move out of a corral, but not yet ready to be put in with the older hens. This room has two screened windows situated toward the top for fresh air. It makes a cozy storage room, and a draft-free hospital/nursery/apartment.
A door, screened at the top, accesses the second room. There are also two windows in this section, as well as another door leading to the screened yard. Both exterior doors lock on the inside as well as the outside. The second room, all 64 square feet of it, has nesting boxes, roosts, and the feed and water stations for the older hens. Most of the upper half of the section between the two rooms is covered with a large section of metal screening that came from a discarded commercial air-conditioning unit. (Hooray for recycling!) The result is a secure, airy coop with two separate sections.
I’ve not kept chickens in the smaller section for almost a year. Earlier this spring, we had a problem with mites in the coop, so when I scrubbed (and re-scrubbed) the coop, this section was cleaned and scrubbed at the same time. Any chickens that I thought might be unhealthy have gone into our wire dog coop and relegated to a separate little straw barn. Fixing up the Teenager’s Apartment for new tenants wasn’t too difficult a task.
First, I moved out all of the bales of shavings and aluminum garbage cans that I use for feed storage. The shavings went into the straw shed and, for the time being, the feed cans ended up on the covered porch of the coop, with bungee cords hooked from handle to handle to thwart nighttime visits by marauding raccoons.
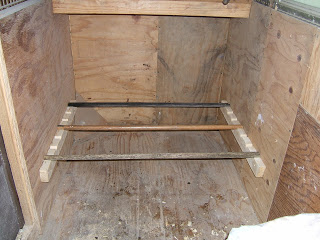
Then, I asked my handyman husband to help me with my adjustable roost idea. He used a 4-foot-long two-by-four board and drilled six 1-inch holes about 8 inches apart down the center of the board. Then, he used his table saw to rip down the center of the board. This left two sections with six “scoops.” He leveled the boards on opposite sides of the coop, and screwed them to the walls about a foot above the floor. Then, he cut three round poles (old wooden broom handles), to the width of the coop. The poles fit exactly in the “scoops,” and are just the right height for little birds to hop up on to roost. As the chickens grow, the boards on the side can simply be unscrewed, raised, leveled and reattached. There are six scoops, too, so the width between the roosts can be adjusted, too, as the chickens grow.
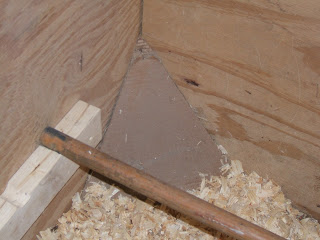
I stapled a section of heavy cardboard to round out each corner. Little chicks tend to huddle together when cold, nervous or otherwise stressed. It’s easy for small chicks to pile on top of each other in a square corner and suffocate. (That’s why I use a round corral for new chicks, too. No corners in which to pile on top of each other.) Eventually, the chicks will be strong enough to shove their way off the bottom of a pile, but a couple of these new birds are smaller than the others, and might not be able to push up from under their heavier sisters.
I cleaned both sections of the coop. I swept floors, wiped down walls, sprinkled diatomaceous earth in the corners of the main (big girls’) coop, and filled the nests with new pine shavings. I also added fresh flake pine shavings to both newly cleaned floors.
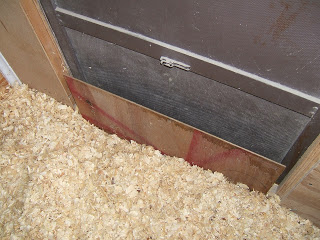
I nailed a piece of light plywood paneling at the bottom of the door going into the main coop. This should keep the chickens from each section separate when I’m going from one part to the other feeding or gathering eggs. My husband made a removable panel section at the bottom of the outside entrance door that will be very handy when it comes time to clean the coop. This will also keep the chicks contained when the door is opened.
Finally, I moved the bag of chick starter from the garage into its own metal container and filled and hung a feeder in the new area. I added a small chick grit feeder that nails to the coop wall. I filled a waterer with fresh water and set it on a cement block in the new apartment. I have had good luck using cement blocks to hold water jugs. They bring the waterer up to a good height for chickens to drink from, they are tall enough that floor litter isn’t easily kicked into the water, they are sturdy and don’t tip easily if a chick or hen decides to stand on one or use it as a jumping off spot.
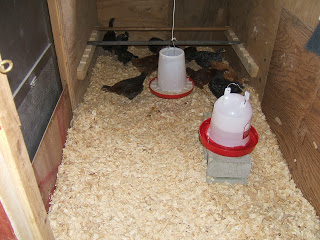 All that the little coop section needed was—a family! Six weeks before, I carried a little box of 12 chicks into my preheated garage and carefully introduced them to their first home, one by one. They were so small that they only filled a quarter of the box they were shipped in. The same box wouldn’t work for this move! I made three trips from my garage to the coop … with four chicks in a box each time. At the new place, I set them carefully on the shaving-covered floor, and then like the first time, I watched. They peeped and squealed and explored. They knew where to find food and water, they pecked at the walls and the cardboard, and they hopped from roost to roost. The only thing that seems to be missing is a spot for my lawn chair!
